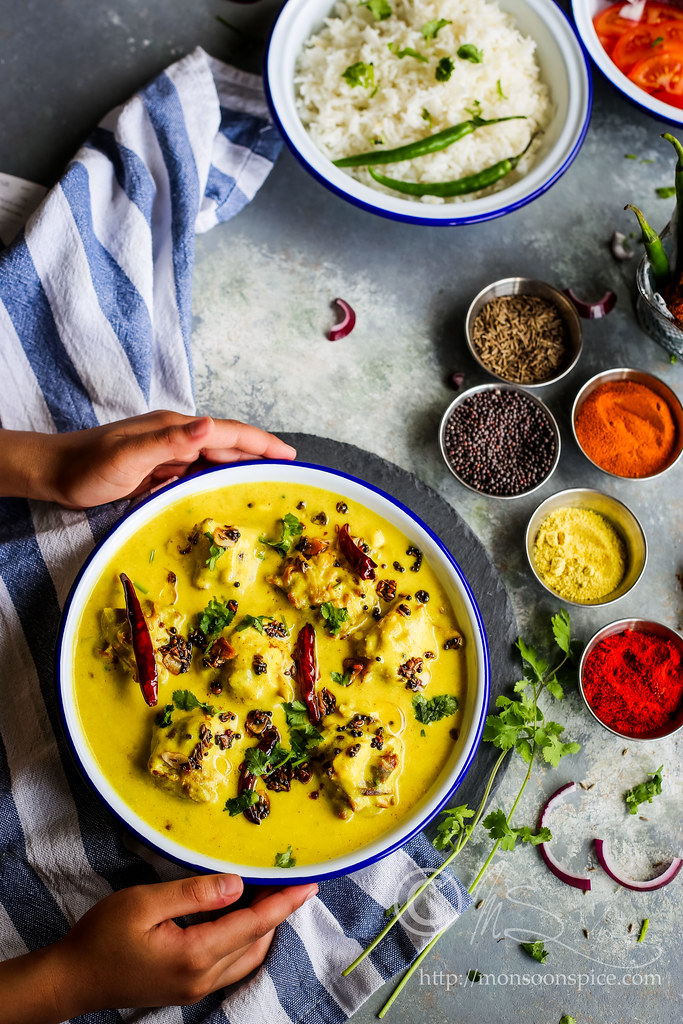
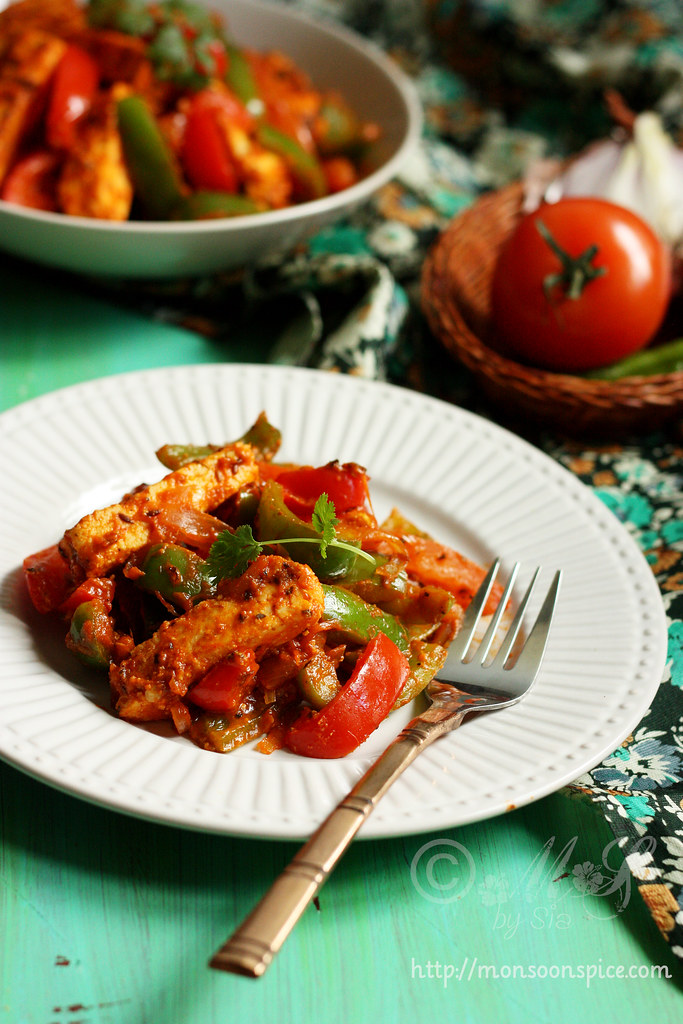
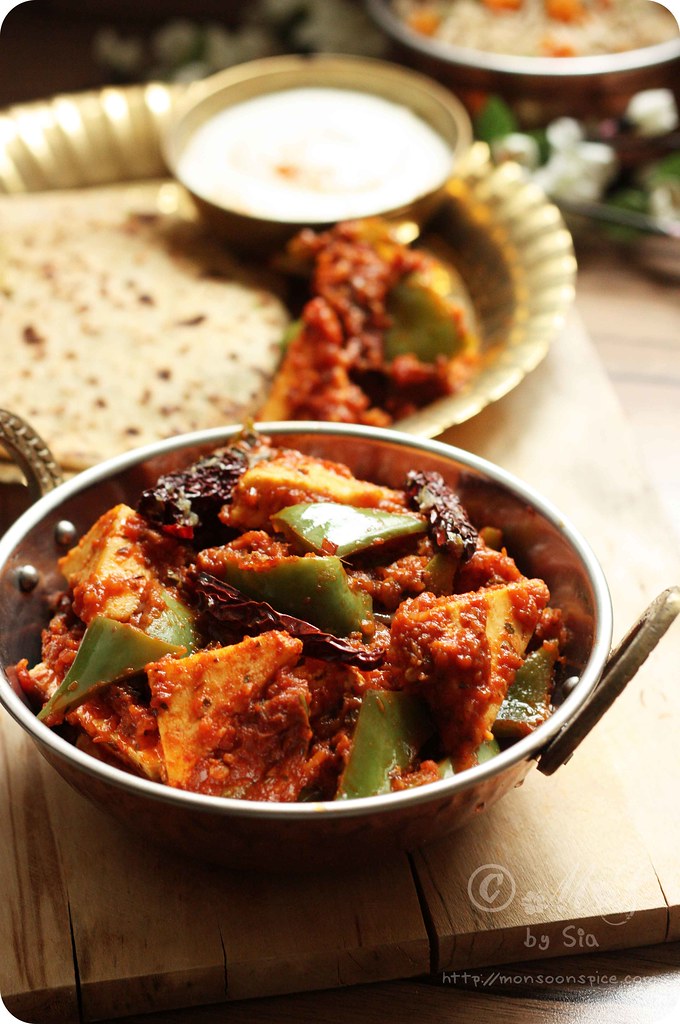
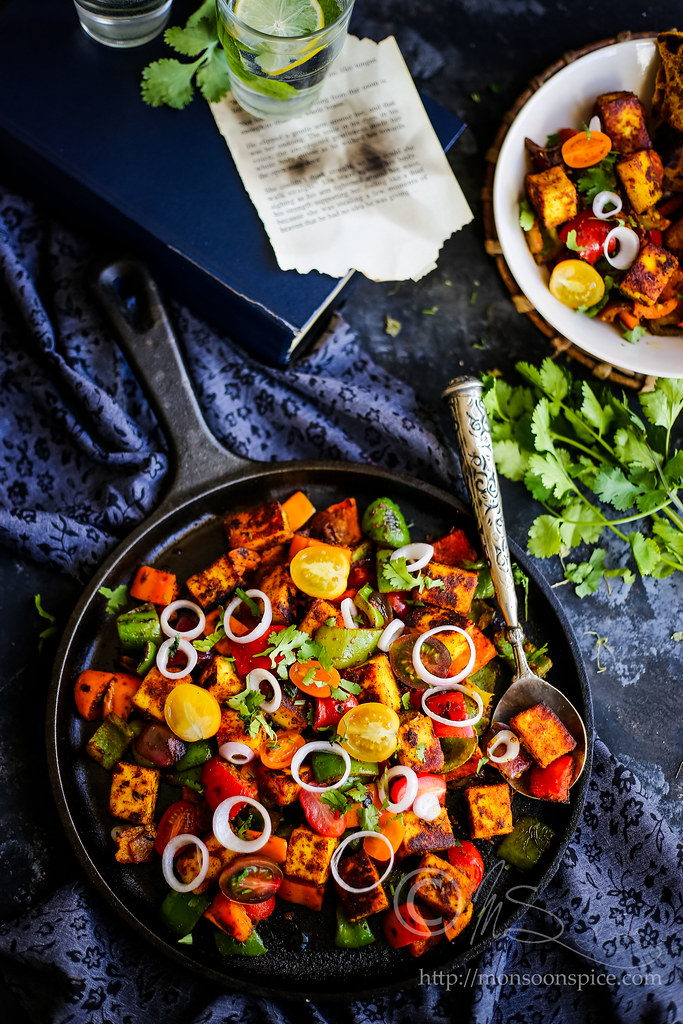
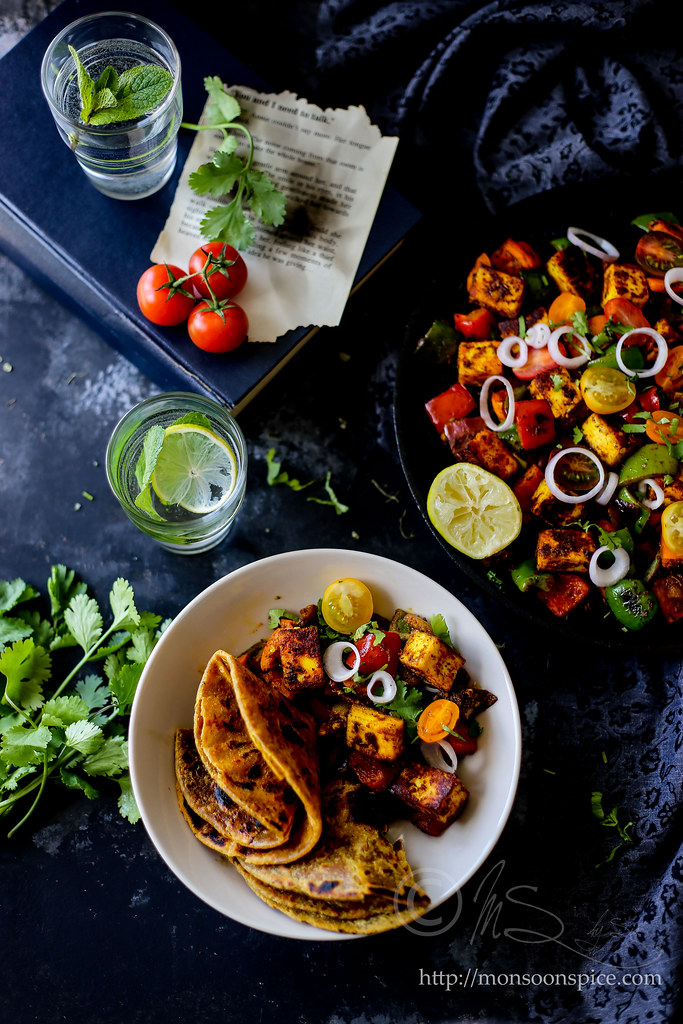
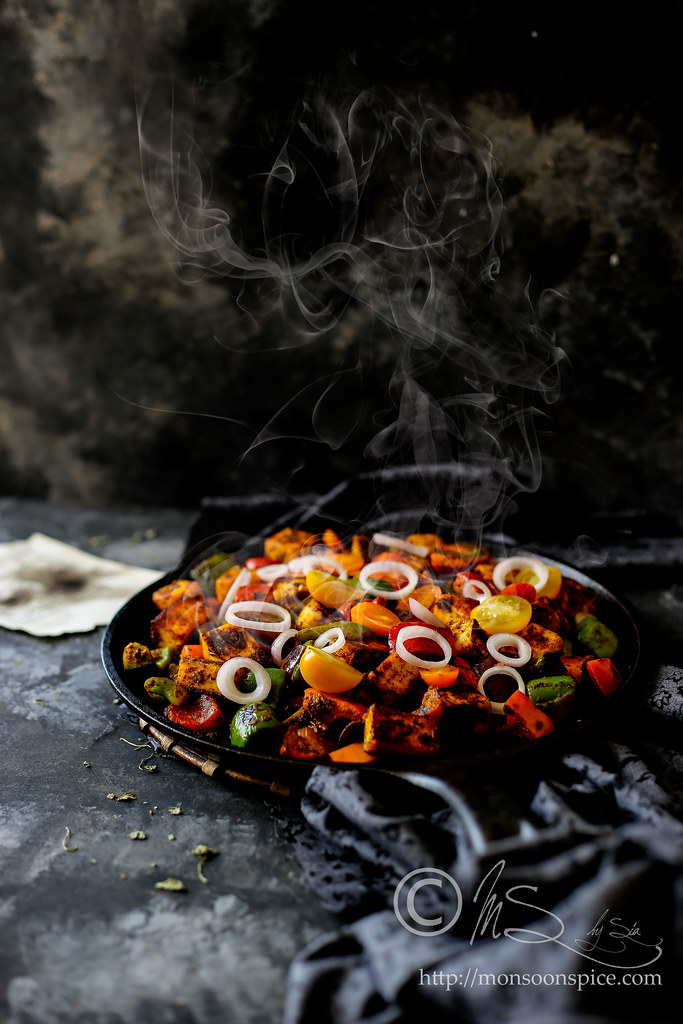
Showing newest posts with label Onions. Show older posts

Friday, 25 September 2009

Badanekayi-Eerulli Huli: This is My Legume Affair

badanekai-erulli-huli3
Badanekayi-Eerulli Huli

Wow! I can’t believe I am actually sitting here in my office and blogging!!! But after months of stress, running around and sleepless nights, I wanted to do something else to charge my batteries and obviously blogging is the first thing that came to my mind. I may still be stressed, worried sick, and running around flapping my feathers like freaking chicken but I have decided to come back and blog as it is the only creative outlet I have at a moment. And what the hell? There is nothing more relaxing at the moment than rant, ramble and vent out in my own small space in this virtual world which calms my jumpy nerves.

First of all, thanks to everyone who wished smooth house move. It indeed went smoothly and we are having lots of fun rearranging and decorating every room in our new home. Although it was bit saddening to leave our first home where we started our life together, our new house felt like home from day one we moved. It’s beyond words to describe the feeling of saying good bye to my first kitchen where I learnt to cook all by myself and where I actually did my first blog post. But at the same time, I love each and every minute of cooking in my brand new spunky kitchen that is equipped with top-end appliances. Slowly but steadily I have started cooking regularly but still haven’t had time to cook something exclusively for blog and take photos. I am sure everything will fall into old routine in few weeks time. I can go on and on rambling about our move but I will leave it for next few posts because there is so much to share!

Next I want to apologise for not posting the round-up for RCI! I know I should have done it 3 weeks back but moving houses have taken major chunk of our time and rest was spent in office trying to finish my project before deadline. Since we still have no TV, internet and phone connection at home, I am slowly putting things together during my lunch break in office. I am hoping to post RCI round-up by next weekend and I hope I’ll be able to stick to my promise this time. It sucks when I can’t fulfil my promise and trust me I am not enjoying it. So friends, give me couple of weeks to wrap up major works at home and office.

Another thing I wanted to mention is about the lovely entries I am receiving for MLLA-15th Helping. Thank you one and all. I will try to reply to all your emails ASAP. Please note that there are only few days left to send in all your entries to win these fabulous prizes sponsored by lovely Susan. So if you have already made the post but haven’t mailed, make it a point to send in all the details before 30th September, 2009.

badanekai-erulli-huli4
Badanekayi-Eerulli Huli

So what have we got today? Of course, a delicious legume recipe for MLLA-15th Helping, brainchild of Susan. The day I saw this recipe of Badanekayi Eerulli Huli posted by my good friend Vani of Mysoorean in our group blog Beyond Curries, I wanted to try it ASAP.

In Vani’s own words,
Huli is a form of dal made mainly in the Mysore/Bangalore regions of Karnataka. It is a thicker version of sambar but made with a different masala and is usually very vegetable-heavy.

During my post graduation days in beloved Bengaluru, this Badanekayi Eerulli Huli was regular dish on our Sunday lunch menu. Served with fried Papads, Majjige Menasu or some potato chips, this was a comfort food i always looked forward to enjoy on lazy Sunday afternoons. So it was inevitable that I try this recipe and re-live the hostel days… Thanks to Vani, I tried this recipe following Vani’s instructions to T. It not only takes me down the happy memory lanes but also tastes so much better than the one I remember. So without much delay let’s make some delicious Badanekayi-Eerulli Huli.

badanekai-erulli-huli6
Roasted Spices for Badanekayi-Eerulli Huli


Badanekai Eerulli Huli (Thick Lentil Stew with Eggplants and Onions)
Prep Time: 5-10 mins
Cooking Time: 30 minutes (20 minutes to cook lentils & vegetables and 10 minutes to prepare the stew)
Serves: 4-5
Spice Level: Medium
Cooking Level: Intermediate
Recipe Source: Beyond Curries
Serving Suggestions: With Rice & Papads/Chips

Ingredients:
1 medium Onion, chopped into ½ inch squares
1 medium sized Eggplant, chopped into 1 inch cubes
1½ cups cooked Toor Dal
3 tbsp fresh/frozen grated Coconut/desiccated unsweetened Coconut/Coconut Powder
¾ tsp Tamarind Paste (Adjust acc to taste)
2 tsp Jaggery or Brown Sugar (Adjust acc to taste)
Salt to taste

For Huli Masala Powder:
2 inch Cinnamon
1 tbsp Chana Dal/Split Bengal Gram
2 tbsp Coriander Seeds
4-6 Dry Red Chillies (Adjust acc to taste)
A small pinch of Hing/Asafoetida
1 tsp Oil

For Tadka/Tempering:
1 tsp Mustard Seeds
A spring of fresh Curry Leaves
½ tsp Turmeric Powder
A pinch of Hing/Asafoetida
1 tbsp Oil

badanekai-erulli-huli1
Badanekayi-Eerulli Huli

Method:
Heat a tsp of Oil in a pan and add all the ingredients listed under Huli Masala Powder. Fry it on low to medium flame until fragnant, about 2 mins. Let them cool before you grind them to fine powder.
Now add grated coconut to this masala powder and grind to smooth paste adding very little water. Keep it aside till needed.
Heat oil in a deep pan and add mustard seeds. When mustard starts to pop and splutter, add hing, turmeric powder and curry leaves.
Immediately add onions, eggplants, and about 1½ cups of water.Cover the pan with lid and cook until eggplants are tender, about 7-8 mins, on medium flame.
Next add the coconut paste, cooked toor dal and salt to taste and bring the whole mixture to gentle boil.
Add tamarind paste, jaggery and adjust the seasonsings. And cook for 2-3 minutes for all the flavours to blend well.
Serve this delicious Badanekayi-Eerulli Huli with rice, papad/chips and a dollop of Ghee and enjoy.


Notes:
The consistency of Huli is very thick as compared to Samabr. So make sure that you drain the water from dal before adding with the vegetables. Also, make sure that you use very little water when grinding the coconut paste.
Vani suggests that you can also use the combinations of other vegetables like onion and potato, chayote and balck eyed beans, green leafy vegetables, cabbage and beans.

Continue Reading...


Thursday, 6 August 2009

Quick Onion & Capsicum/Pepper Subji: Quick, Simple, Delicious & Healthy too!!!

capsicum-subji1
Quick Onion & Capsicum Subji

Quick – tick.
Simple – tick.
Delicious – tick.
Healthy – tick.

Wondering what am I talking about?

Recipe, of course! These days whenever I cook I go through these four pointers. I am looking for the recipes which quick to cook so that it saves lot of my time in doing rather something more important. And it should also be rather simple as I am trying to use very little ingredients so that the taste of main ingredient or the star ingredient is not chocked to death by hundreds of other ingredients and spices. Since I believe you can cook tasty and delicious food in spite of the recipe being quick and simple one I look out for those recipes that sound promising to produce the same result. Last but not the least, the health factor and I am, well, very conscious about it and try to make sure that the ingredients retains its nutrition and are not overly cooked all the time.

So when my dear friend Alka posted recipe of Quick Onion & Capsicum Subji on our group blog Beyond Curries, I knew I had to cook and taste!!! This recipe of Quick Onion & Capsicum Subji uses few ingredients and could be prepared in flat 15 minutes time. And it’s not only delicious but also healthy as it is a quick stir fry and not overly cooked for hours making it loose all its nutrition. And the bonus is its pretty to look at :) Who in their right mind can ignore this blissful delight! Well, not me ;) So dear readers please give this quick stir fry a try and let me know if you think the same. While you are enjoying this quick capsicum recipe, take a look at my post on pearly delight of Sagu/Sabudana Kichidi at Beyond Curries :)

capsicum-subji2
Coloured Bell Peppers for Quick Onion & Capsicum Subji


Quick Onion & Capsicum Subji (Quick stir fry of Bell Peppers and Onion)
Prep Time: 5 mins
Cooking Time: 10-12 mins
Serves: 4-5
Recipe Level: Easy/Beginner
Spice Level: Low to Medium
Serving Suggestion: With Chapatti or Rice and Dal
Recipe Inspiration: Beyond Curries

Ingredients:
3 Capsicums/Bell Peppers, cut into 1 inch squares
1 large Onion, cut into 1 inch pieces
2 medium Tomatoes, finely chopped
2 Green Chillies, slit
½-1 tsp Garam Masala/Kitchen King Masala
1 tsp Coriander Powder
A pinch of Haldi/Turmeric Powder
A pinch of Sugar
Salt to taste

For Tadka:
1 tsp Jeera
½ tbsp Oil

capsicum-subji4
Quick Onion & Capsicum Subji

Method:
Heat oil in a pan and add cumin seeds to it. When cumin sizzles and turns golden red in colour.
Mix in chopped onions and green chillies and sauté till onion turn light golden in colour.
Add chopped tomatoes, coriander powder, turmeric, sugar and garam masala/kitchen king masala and cook for 3-5 minutes till tomatoes are cooked through.
Add chopped capsicums/bell peppers and sauté for 4-6 minutes so that it is lightly cooked yet retains its crunch.
Switch off the gas and mix in finely chopped coriander leaves. Serve this Quick Onion & Capsicum Subji with Chapatti or rice and enjoy!

Continue Reading...


Friday, 12 June 2009

Capsicum & Baby Corn Curry with Random Rants :)

Capsicum-baby-corn-curry1
Capsicum & Baby Corn Curry

Missed participating in blog events - Check.
Missed visiting blogger friends – Check.
Missed leaving comments in their blog – Check.
Missed posting recipes twice a week – Check.
Missed writing new post for Beyond Curries – Check.
Missed cooking recipes from other blogs (at least 2 recipes per month) – Check.
Missed taking photographs of new recipe I cooked and loved for blog – Check!!!!!!!!!!

Well, I can understand the first six things happening now and then when I am buried till my nose with all new projects and meeting deadlines. But I am still scratching my head thinking how I could have missed taking photos for my blog??? Looks like I am not only busy with hectic work schedule but may be little stressed also. HELP… Anybody?!

Few days back I found few interesting replies from friends on FB when I mentioned that my blog honeymoon period seems to be finally over after 2½+ years of blogging. Some said they too are sailing in the same boat with me and others said this too shall pass! But there was this dear friend of mine who mentioned as far as she was concerned, her relationship with her blog is over and they are divorced! :) I couldn’t help but wonder what will happen to my blog in few months time? Will I ever reach that stage and stop blogging for good? Hopefully not for a while… Yes, not yet!!!! I hope that dear friend of mine resumes blogging as I really miss visiting her witty, humorous and delicious blog. And at the same time I wonder will I be missed by readers of my blog if I decide to stop blogging? :) Looks like I have some food for thought ;)

And not to forget, I also have some recipe for all you lovely people. Today we have this simple, delicious and flavourful Capsicum & Baby Corn Curry to please all your senses! I am quite fond of coloured bell peppers and baby corns and I use them quite often in Indo-Chinese cuisines. Using these two veggies in Indian cuisine has got nothing to do with my creative brain cells or unusual taste buds. It was the result of lack of vegetables in fridge and also laziness to go out for shopping. But I am not here to complain as the chemistry between bell peppers and baby corns was quite hot and sizzling and they literally set our taste buds on fire! ;) While creamy onion and almond gravy tasted superb, the crunch from capsicum and baby corns were very pleasing to our palettes. When served with soft and warm Phulkas and simple Cumin Rice, it was nothing short of touching the stars! Try this curry when you are tired of eating same combination of vegetables or pulses and see this colourful Capsicum & Baby Corn Curry winning positive approval from everyone sitting around your dining table. :) And off this goes to dear Vysh who has spiced up all our blogs by asking us to cook some spicy dishes for her JFI: Chilli, an event initiated by dear Indira of Mahanandi and dear Priya who is guest hosting AFAM-Bell Peppers, an event started by Maheshwari of Beyond Usual.

Capsicum-baby-corn-curry
Capsicums & Baby Corns

Photobucket Print This Recipe
Capsicum & Baby Corn Curry (Tender Baby Con and peppery Bell Peppers cooked in creamy gravy of Onion, Tomato and Almonds)
Prep Time: 10 mins
Cooking Time: 30-40 mins
Serves: 4-6
Recipe Level: Medium
Spice Level: Medium to Hot
Serving Suggestion: With any Indian flat breads or with flavoured/steam cooked rice

Ingredients:
15 Baby Corns, cut into 1 inch pieces
2 large Capsicums/Bell Peppers (I used 1 red and 1 green)
3 large Tomatoes, pureed
1 tsp Garam Masala
½ tsp Kitchen King Masala (Optional)
1 tsp Coriander Powder
½ tsp Cumin Powder
½ tsp Turmeric Powder
½ tsp Amchur/Dry Mango Powder or 1 tbsp Lime Juice
1 tsp Sugar (Optional but recommended)
1 tbsp Oil
Salt to taste

For Onion-Almond Paste:
1 tsp Jeera/Cumin Seeds
1 large Onion, peeled and roughly chopped
1 tsp Ginger-Garlic Paste
1 inch Cinnamon Stick
2 Green Cardamoms
2 Cloves
10 Almonds, soaked in warm water for 10 mins and skinned
½ tbsp Oil

Capsicum-baby-corn-curry2
Capsicum & Baby Corn Curry

Method:
For Onion-Almond Paste:
Heat ½ tbsp oil in a pan and add cinnamon stick, cloves and green cardamoms. Cook for a minute, on medium heat, and then add cumin seeds to it. When cumin starts to sizzle and turn golden red, add roughly chopped onions and fry till they turn transparent, about 2 mins.
Next add ginger-garlic paste and stir for a minute or two till raw smell disappears. Switch off the flame and transfer the content to food processor or mixer jar. Let it cool slightly.
Add skinned almonds and grind the mixture to smooth paste without adding any water.

Proceed to Make Curry:
Heat tbsp of oil in a pan and add ground onion-almond paste. Saute on medium flame till the paste turns light golden brown in colour and becomes one dry mass, about 5-6 mins.
Add garam masala, kitchen king masala, turmeric powder, coriander powder and cumin powder and stir for 30 seconds.
Mix in pureed tomatoes and give it a good stir, about 3 mins. Add 1-1½ cups of water, amchur powder, sugar and mix in salt to taste. Keep the flame on medium and bring the whole gravy to gentle boil, about 5 mins.
Add baby corn pieces and cover and cook for 5 mins. After 5 mins, add peppers/capsicums and cook uncovered for another 5-7 minutes till vegetables are cooked through but retain their crunch.
Serve this delicious Baby Corn-Capsicum Curry hot, garnished with finely chopped coriander leaves, with any Indian flat bread or flavoured rice and enjoy.

Continue Reading...


Wednesday, 20 May 2009

Tofu Matar: Why Not Try Something New Today?

tofu-matar3
Tofu Matar

Last week I was here, staying at one of the picturesque places of England. Our little cottage was tucked in between soothing sound of flowing river, breath taking landscape of mountains and miles of green fields. For once we were away from everyday hustle bustle and running around chasing deadlines and never ending word loads and I couldn’t help but feel blessed to be surrounded by Mother Nature in her warm bosom!

Every morning we woke up to tweeting birds and oh yes, braying sheep which was music to our ears compared to deafening alarm clock or noise from traffic. The weather God was unbelievably kind to us during our stay and everyday I felt the warmth of bright sun and his rays dancing on my face. As the puffy marshmallow-ey clouds floated on clear blue sky, puffy and soft bundle of woolly sheep were lazily munching the emerald green grass. And those little, cute lambs hopping and jumping around merrily were the constant reminder of my own childhood days! While buzzing bumble bees were soothing music to ears, the burst of colourful wild flowers were joy to eyes, and even the smell of earth was much better than the aroma of any expensive and exotic perfumes on my dressing table. Nature, free of all man made things, is a soothing balm to ones troubled spirit and heart! It was nothing short of heaven! It’s amazing to see how Mother Nature takes care of all her children, including us, by embracing us in her warm bosom. I, after a long time, felt at peace with my inner self…

Fast forward and I am back to reality of daily routine life! As much as I enjoyed my break; it feels good to be back to some kind of routine! After one week of indulgence in peaceful countryside retreat, I felt good to be back in familiar surrounding and especially to be cooking in my little kitchen. Since our fridge was almost empty except for few herbs, I used the ingredients in hand and prepared this delicious Tofu Matar by giving a twist to much loved Matar Paneer. Creamy tofu and lively and bouncy green peas literally dunked in creamy gravy of onion, tomato, cashew and almonds was match made in heaven! Addition of Kasuri Methi gave that ‘oomph’ factor to the curry and made it all the more enjoyable. Don’t be chuffed off by the list of ingredients as close inspection will show how simple this recipe is. Cook it for your Vegan friends or people like me who are fond of tofu and see them lick their plate clean! :)

tofu-matar1
Tofu Matar

Photobucket Print This Recipe
Tofu Matar (Tofu and sweet Green Peas cooked in creamy gravy of Almonds & Cashews)
Prep Time: 10 mins
Cooking Time: 20-30 mins
Serves: 5-6
Recipe Level: Medium
Spice Level: Medium
Serving Suggestion: With any Indian flat breads or with flavoured/steam cooked Rice

Ingredients:
1 pack Tofu (approx 5X5 inch), cut into 1 inch cubes
1 heaped cup Green Peas, fresh/frozen
3 large Tomatoes or 1 canned Tomato, pureed
1 tbsp Kasuri Methi/Sun dried Fenugreek Leaves (Optional)
1 tsp Garam Masala
½ tsp Kitchen King Masala (Optional)
1 tsp Sugar
1 tsp Jeera/Cumin Seeds
1 tbsp Oil
2 tbsp Coriander Leaves, finely chopped
Juice of ¼ Lime/Lemon
Salt to taste

For Onion Paste:
1 large Onion, roughly chopped
¾ inch Ginger, peeled and roughly chopped
2 large cloves of Garlic
½ inch Cinnamon Stick
2 Green Cardamoms
2 Cloves
½ Star Aniseeds

For Almond-Cashew Paste:
8-10 Almonds, soaked in warm water for 10 mins and peeled
4-6 Cashews, soaked in warm water for 10 mins

tofu-matar
Tofu Matar

Method:
Grind all the ingredients listed under onion and almond-cashew paste separately, with out adding any water, to smooth paste and keep aside.
Heat oil in a pan and add cumin seeds to it. When cumin starts to sizzle and turn golden red, add onion paste. Keep stirring for 6-8 mins till onion paste turns light golden brown and becomes one dry mass. Make sure that you cook this onion paste thoroughly or else the gravy will taste bitter.
Mix in sugar and kasuri methi leaves and stir for another minute or two. Next, add pureed tomatoes and mix well. Bring the mixture to gentle boil, about 4-5 mins.
Mix in garam masala, kitchen king masala and salt to taste and add about 1-1½ cups of water.
Reduce the heat to low and add tofu cubes and green peas and cover the lid. Let it cook undisturbed for 5 mins.
Mix in almond and cashew paste and stir well. Increase the heat to medium and let the curry cook uncovered for another 5-7 mins. The gravy will start to thicken at this stage. Adjust the seasoning and add little more water if you prefer little thin gravy.
Switch off the flame and squeeze in lime juice. Serve this delicious Tofu Matar garnished with coriander leaves and enjoy!


Notes:
Those who don’t like Tofu can simply substitute it with Paneer. Shallow fry Paneer cubes in little ghee till both the sides turn golden red in colour. Keep them in a bowl of warm water till needed and proceed with the recipe.
And if you are not fond of Paneer and Tofu, simply substitute them with boiled, peeled and cubed potatoes.
Green peas can be substituted with black or Kabuli channa or chickpeas.

Continue Reading...


Tuesday, 17 March 2009

Bhindi Do Pyaza: Say No to Slimy Okra!

Photobucket
Bhindi Do Pyaza

What happens when you balance laptop in one hand, cloths basket in another hand, two coffee mugs dangling from fingers?
Well, nothing!
And imagine same scenario and you are climbing down the stairs, looking back and chatting away to glory?

Now we are talking!!! The result of such silly and stupid thing is you end up tumbling down from top stairs to bottom and then end up either with broken bones or severe back pain! That’s what happens when you are not watching your steps!!! Thankfully I didn’t end up with broken bones but suffered enough from back pain and bruises for few days! Never in my life had I felt good about those excess fat around hips ;) That’s the only reason I am walking (hopping/jumping is the right word in my case) without clutches or wheelchair today!

Since I was strictly kept away from kitchen or even getting up from bed/sofa (how boring!), TH was in charge of cooking. So here is my Sous chef, totally in control of everything and cooking one delicious dish after another, not only impressed me immensely with his cooking skill but also giving some tough challenge in kitchen. Looking at the way he’s been cooking storms in kitchen, I am having serious doubt about him starting his own food blog ;) Don’t you believe me? Then how about these crispy and delicious Bhindi Do Pyaza cooked by my much better half?

Bhindi Do Pyaza is a simple stir fry of Okras and Onions with just few spices. It’s one of the simple dishes which can give very tough competition to any complex dish. Flavour wise, the combination of crunchy okras and sweet onions can blow you away when cooked right! Only thing that you need to do is stir fry the okras in very high heat, adding right amount of oil and you will be surprised to see how crisp they turns out! So are you ready to say good bye to gooey, mushy okras and welcome this queen of vegetables with a very big hand? Shall we start the party?

Photobucket
Bhindi Do Pyaza

Photobucket Print This Recipe
Bhindi Do Pyaza (Simple yet delicious crispy stir fried slivers of Okra and Onion)
Prep Time: 10 mins
Cooking Time: 10 mins
Serves: 4-6
Recipe Level: Basic/Beginner
Spice Level: Low to Medium
Serving Suggestion: With any Indian flat bread or flavoured/steam cooked rice

Ingredients:
25-30 Okras, washed, dried and slit vertically and cut into 2 inch pieces
2 medium Onions, thinly sliced
2-4 Green Chillies, slit (adjust acc to taste)
1 inch Ginger, finely chopped or grated
½ tsp Turmeric Powder
1 tbsp Lime/Lemon Juice
1 tsp Jeera/Cumin seeds
½ tsp Kalonji/Nigella Seeds (Optional)
2+1 tbsp Oil
Salt to taste
Photobucket
Bhindi Do Pyaza

Method:
Heat 2 tbsp of oil in a pan and add sliced okra to it. Stir fry on high flame till brown spots start to appear on sliced okra and its sliminess is reduced. It will take good 4-5 minutes for the okra to cook through yet retaining its colour and crispiness. Transfer the stir fried okra to dry plate lined with kitchen/paper towel.
Heat tbsp oil in a same pan and add kalonji and jeera seeds. When jeera starts to sizzle and turn golden red in colour, add sliced onions, green chillies and finely chopped ginger and stir fry till onions turns translucent. Add turmeric powder and stir fry till onions turn golden brown.
Mix in okra, lime juice and salt to taste and continue to stir fry for another 2-3 minutes for all the flavours to blend well.
Serve this delicious Bhindi Do Pyaza with some curry/dal and rice/chapatti and enjoy.


Notes:
Few tips for those who find it difficult to cut, and cook those slimy Okras.
Always choose young and tender okras. The best ones are the ones that get easily snapped when you bend the tail end of the pod.
Make sure that you dry the Okra completely after washing them in water. Either spread them on kitchen towel in single layer and leave it for few hours or pat them dry with dry kitchen papers/towels. It is a must that the okras are dried properly if you don’t like them go slimy.
Next while chopping them; make sure that you have dry chopping board and knife. Keep dry kitchen paper next to you and clean the slime from knife using it whenever needed.
I have tried stir frying the okra with very little oil and ended up with really slimy okras. So then onwards I usually use little more oil than normal and cook it on a very high heat. This way the okras not only get cooked fast and retain their crispiness, but also any moisture in them disappears at high heat. And you will be surprised to see how the sliminess is reduced in short period of time.

Continue Reading...


Wednesday, 11 March 2009

Malai Kofta: Temptress, Seductress and Highly Addictive!

Photobucket
Malai Kofta

“The way to a man’s heart is through his stomach”.

Do you know the origin of this theory? It is said that the American statesman John Adams wrote in a letter some where in early 19th century, “The shortest road to men's hearts is down their throats” and that's how this theory or statement was originated. So my question is how many of you believe in this theory? Does this statement hold true in your life?

When I think of 19th century I get these black and white images of that era flashing in front of my eyes where many men looked for good wife who would be a good mother to his children and take care of his family affairs. The fact that she could cook well was a good indication to her role of being a nurturer. Unlike our time where we have an option of marrying a person whom we know and eventually fall in love with them, it may have been the best way to please his stomach and work your way up in winning his heart in that period of time! Steaming pot of delicious food may make someone feel cared for by triggering their childhood memories of food served by their loving mother. I wonder if this feeling of satisfaction after been served a good food is mistaken for love!

Cooking is not just chopping, grinding or mashing and throwing everything into a pot and stirring. Any good cook will be able to tell you how much work is involved when it comes to cooking food for someone you care. The person who cooks for you at home knows what food you like, how you like it and when you like to have it. When I cook for someone I make sure that they will remember the food I cooked for long time, a very long time indeed! I choose the best of ingredients with care and use them in such a way that they leave lasting impression. Even everyday simple food served to my man is cooked with utmost care and love. There are no food games in my kitchen as the food should not only taste good it should also be good for you. Well, don’t we all agree that the food cooked with care and love not only will taste good, it will also make them feel cared for and make them feel at home?

We can also argue that food alone is not enough in making the relationship work between two individuals who think differently and have different opinions. There are few restaurants that serve the best food I have ever tasted. Does that mean I will fall in love with chefs just because he/she cooked one of the best meals I have had? I know for sure that the food is prepared with utmost care and to a very high standard. After all I am paying very high price for that plate of meal. In an end it is my man who cooks simple everyday Rasam and Dal whom I love. He may not be the best cook around but he has many qualities that made me fall in ultimate love trap :) It’s definitely not our cooking skills that made us love each other. Any relationship to go strong needs many other qualities in each other and not just our cooking skill. But yeah, we can’t rule out the fact that ability to cook good food will definitely help in nurturing the relationship. Remember, it’s just one of the things that can take you close to man’s heart! Not the ultimate one…

Photobucket
Malai Kofta

This is a good topic for discussion/debate and I have participated in many such discussions. Sometimes I agree with this theory and there are times when I have gone against it. We will continue to argue on this topic as long as there are people who love to cook and eat good food. So I can’t just come to a conclusion as whether I agree with it or not. But it would be great to hear from you as what do you think of it? So let’s hear from you guys…

While we are on this topic, let me share one of the ultimate food seductions. We have Malai Kofta in our menu today. Spicy dumpling of Indian Cottage cheese that is deep fried and served in delicious, creamy and spicy gravy of fresh cream and onion-tomato paste is nothing short of sinful indulgence. Try cooking it once and see your taste buds falling head over heels in love with this tempting Malai Kofta. Yes, Malai Kofta is a temptress, a seductress and highly addictive! ;) I am sending this to Lavi who is guest hosting this month's RCI-Lucknow, a wonderful event started by dear Lakshmi of Veggie Cuisine.

Photobucket
Koftas, Before & After Deep Frying

Photobucket Print This Recipe
Malai Kofta (Deep fried spiced Indian Cottage Cheese dumplings in creamy Onion & Tomato gravy)
Prep Time: 15 mins
Cooking Time: 45-60 mins
Serves: 6-8
Recipe Level: Intermediate to Difficult
Spice Level: Medium
Serving Suggestion: With any Indian flat bread or flavoured/steam cooked rice

Ingredients:
For Kofta:
1½ cups Grated Paneer
2 large Potatoes, cooked, peeled and well mashed
1 medium Onion, very finely chopped
2 tbsp Coriander Leaves, very finely chopped
2-3 Green Chillies, very finely chopped (Optional, adjust acc to taste)
1½-2 tbsp Gulab Jamun Mix/Milk Powder (Optional but recommend)
¼ cup Bread Crumbs
2-3 tbsp Corn Flour (Acts as a binding agent while deep frying)
1 tsp Garam Masala
½ tsp Amchur/Dry Mango Powder (Optional, for little tangy flavour)
6-8 Cashew Nuts, cut into small pieces (Optional but recommend)
1-2 tbsp Raisins (Optional but recommend)
Salt to taste
Oil for Deep Frying

For Gravy:
For Onion Paste:
2 large Onions, peeled and quartered
1 inch Ginger, peeled
3-4 cloves Garlic
1 inch Cinnamon Stick
3 cloves
3 Green Cardamoms

Other Ingredients for Gravy:
4-5 large Tomatoes, pureed
1 tbsp Cashew/Almond Paste
¼-1/2 cup Fresh Cream (I used low fat single cream)
1-2 tsp Garam Masala (Adjust acc to taste)
1 tsp Kitchen King Masala (Optional)
½ tsp Turmeric
½-1 tsp Kashmiri Chilli Powder (Optional)
1 tbsp Kasuri Methi/Sun dried Fenugreek Leaves
½ tbsp Sugar
1 tbsp Oil
1 tsp Cumin Seeds
A pinch of Hing/Asafoetida
Salt to taste
Photobucket
Malai Kofta

Method:
For Gravy:
Heat oil in a pan and add cumin seeds and hing. Add onion paste that you had prepared just when cumin starts to sizzle and turn golden red. Stir it continuously for 5-7 minutes till the paste turn golden brown and the raw smell of onion disappears. This is the very important step as you don’t want to rush and end up having bitter tasting gravy. So be patient!
Once the onion paste is cooked thoroughly add kasuri methi and sugar. Saute for a minute or two. Next add tomato puree and stir well. Cover and cook for about 5 minutes.
Next add garam masala, kitchen king masala, turmeric powder, Kashmiri chilli powder and salt to taste and mix well. Bring this whole gravy to gentle boil, about 5 minutes.
Mix in cashew/almond paste, fresh cream and ½-1 cup of water (depending how thick you prefer the gravy) and cook for another 5-7 minutes on low flame.
Adjust the seasoning and add little more water if the gravy is too thick and cook for another 2-3 minutes. Switch off the flame and mix in finely chopped coriander leaves.

For Koftas:
First, mix paneer with mashed potatoes, onions, coriander leaves and chillies. Make sure that the paneer and potatoes as lump free as possible. Then add gulab jamun mix/milk powder, salt to taste, garam masala, amchur powder, broken cashews, raisins, bread crumbs and corn flour to the vegetable-paneer mix and mix them well. Use hands when mixing all these ingredients and make sure that all the ingredients are mixed properly. The consistency whole mixture should be as that of chapatti dough and you should be able to make lemon sized balls without breaking them.
Next heat oil for deep frying and reduce the heat to medium to low flame. Make small lemon/golf sized balls and deep fry them in batches of 3-4 balls at time. If the koftas start to break, add 1-2 tbsp of corn flour to the mixture, mix them well and make small lemon sized balls. Fry them till they turn golden brown and crisp and place them in a bowl lined with kitchen towel to absorb excess oil.
Alternatively you can bake them in an oven at 175 deg centigrade for about 20-30 minutes or fry them in Appam Pan with little oil till they turn golden brown.

To Assemble and Serve:
Heat the gravy for few minutes and then transfer it to serving dish. Arrange the koftas in gravy and top it with finely chopped coriander levaes. Malai Kofta tastes best when served with any Indian flat bread (I prefer Naan) or flavoured rice like Saffron rice or Jeera Rice with slices of Onion and lemon wedges.

Photobucket
Malai Kofta


Notes:
When you deep fry the koftas, first make sure that the oil is hot enough before you place them for deep frying.
Place one kofta at a time in a pan when deep frying. If the Kofta starts to break or crumble add about 1-2 tbsp of corn flour and mix well. Corn flour acts as the binding agent and will prevent the koftas from breaking when deep frying.
Always fry the koftas in low-medium flame so that they are cooked well and get lovely golden brown colour.

Continue Reading...


Wednesday, 18 February 2009

Masala Bhindi: Going Nuts!

Photobucket
Masala Bhindi

There are so many things happening around me, so many things that I want to write and so many thoughts to share. But today I feel like I have run out of words. May be I’ll be able to do it once I clear my mind and focus on just one thing at a time. But I am not sure when this going to happen! :)

So, al I am going to write about is food and just food, till I bounce back with some old stories, some sweet memories, some crabby bites and whole lot of rants. Today’s recipe is something I tried few days back, it’s Masala Bhindi. It was another hectic day at office and I was seriously not in a very good mood to cook anything, let alone chop vegetables and grind spice powder. But the thought of good food and wasting big bagful of Okras that I bought for ridiculous price were enough to dive into a long process of washing, cleaning, drying and chopping slimy Okras. First I thought of making simple Bhindi Do Pyaz (recipe to come soon) but later changed my mind when I saw a cup of roasted Peanuts sitting not-so-happily in pantry. It was few days back when I had roasted these peanuts to make Coconut-Mango Pulihara/Chitranna and I wanted to finish them as soon as possible.

Peanut with Okra? Sweet okras stir fried with crunchy roasted peanuts. The idea was enough to make me go nuts and with in few mins I was roasted few basic spices along with my favourite lentils to make a spice powder. Along with spices I thought of roasting white Sesames which is not much used in my recipes. Last week I had bought big bag of Indian red Onions (also called curry onions) from Indian grocery shop. It is quite expensive when compared with the usual white onions we get from supermarket but it tastes way too better than white ones. So I picked the biggest one I could find in that 5 kg gunny bag as I like the taste of fried onions. Except for cleaning, drying and chopping of okras, it took me very little time to make this Masala Bhindi. When served with Chapatti, Rice and Dal I felt it was worth all those efforts I put into cooking after one hell of the day! The sweet taste of okra and onion was perfectly in sync with roasted spice powder, peanuts and sesame. Try this recipe if you are tired of same old Bhindi Fry or Bhindi Masala and discover the nutty combination ;)

Photobucket
Roasted Spice Powder, Okras & Peanuts for Masala Bhindi

Photobucket Print This Recipe
Bhindi Masala (Stir fried Okra and Red Onion spiced with ground roasted spices, Peanuts and Sesame)
Prep Time: 10-15 mins
Cooking Time: 15 mins
Serves: 4-5
Recipe Level: Easy/Beginner
Spice Level: Low to Medium
Serving Suggestion: With any Indian flat bread or flavoured/steam cooked rice

Ingredients:
25-30 small and tender Okras (about 8-10 cups), trimmed and cut into 1 inch pieces
1 large Red Indian Onion, thinly sliced
2-3 Cloves of Garlic, finely chopped
½ tsp Haldi/Turmeric Powder
¼ cup Roasted Peanuts
1 Roasted white Sesame Seeds
Juice of ¼ - ½ Lime (Adjust acc to taste)
2-3 tbsp Oil
Salt to taste

For Spice Powder:
½ tsp Jeera/Cumin Seeds
A big pinch of Hing/Asafoetida
½ tbsp Channa Dal/Split Chickpeas
¼ tbsp Urad Dal/Split Black Lentils
2 tbsp Roasted Peanuts
½ tbsp Roasted white Sesame
3-5 Dry Red Chillies (Adjust acc to taste)

For Tadka:
1 tsp Jeera/Cumin Seeds
Few Curry Leaves
A big Pinch of Hing/Asafoetida
1 tbsp Oil
Photobucket
Masala Bhindi

Method:
Dry roast cumin, hing, channa dal, urad dal and red chillies in a pan till the lentils turn golden brown and aromatic. Let them cool and combine with roasted peanuts and sesame. Grind them all into a fine powder using coffee grinder or mixer. Keep it aside till needed.
Heat 2-3 tbsp of oil in a pan and add chopped okras to it. Cook them on high heat, stirring continuously, till okras turn crisp and brown spots start to appear. It usually takes around 5-7 minutes. Transfer these fried okras into a plate lined with kitchen towel.
Next heat 1 tbsp of oil in a pan and add cumin seeds, hing and curry leaves to it. When cumin starts to sizzle and turn golden red, add thinly sliced onion and finely chopped garlic. Sauté continuously till onions turn golden brown, about 2-3 mins.
Mix in turmeric and ground spices and toss them well. Make sure that the spices are evenly distributed among onions. Now add fried okras, salt to taste and mix well. Cook them for two more minutes making sure that the spices have coated every piece of okra.
Switch off the pan and mix in lime juice, roasted peanuts and sesame and toss well. Serve this delicious Masala Bhindi with Rice/Chapatti and Dal and enjoy.

Photobucket
Masala Bhindi


Notes:
Few tips for those who find it difficult to cut, and cook those slimy Okras.
Always choose young and tender okras. The best ones are the ones that get easily snapped when you bend the tail end of the pod.
Make sure that you dry the Okra completely after washing them in water. Either spread them on kitchen towel in single layer and leave it for few hours or pat them dry with dry kitchen papers/towels. It is a must that the okras are dried properly if you don’t like them go slimy.
Next while chopping them, make sure that you have dry chopping board and knife. Keep dry kitchen paper next to you and clean the slime from knife using it whenever needed.
I have tried stir frying the okra with very little oil and ended up with really slimy okras. So then onwards I usually use little more oil than normal and cook it on a very high heat. This way the okras not only get cooked fast and retain their crispiness, but also any moisture in them disappears at high heat. And you will be surprised to see how the sliminess is reduced in short period of time.

Continue Reading...


Monday, 17 November 2008

Baingan Ka Bharta with Sorry Tale of my Life...

Photobucket
Baingan Ka Bharta

One month after our wedding…
Dial 009108£$%^&*!”
~Trinnnnn, trin…. Trinnnnn, trin~ (oh, that’s old dial mode-walah telephone ringing)

Amma: Helloooo…
Me: Amma… ~sob, sob~
Amma: ~Little worried~ What happened dear-first-born-and-at-last-married-and-gone?
Me: Amma, I want to come back to India.
Amma: Err… Why? Where is apple-of-my-eyes-son-in-law?
Me: He is in his office and I am all alone. I am bored here. I want to come back.
Amma: Oh! That’s all? Read books. I will send you few more novels by your favourite writers as soon as possible along with another jar of your favourite Mavina kai midi pickle.
Me: No, I want to come home! To my own house, my room, my books and my things. Don’t you miss me at all?
Amma: ~Clears her throat~ Well, not that much. You see now we have Bubbly with us now and she keeps me on my toes 24/7. She has shifted to your room and she likes to sleep under your bed. And naughty girl that she is, other day she climbed your bed and hid under your favourite blanket.
Me: What? How could you let her sleep in my room?
Amma: She loves your room as it is spacious and clean unlike your brother and sisters. And as it has got that large balcony looking at the street, Bubbly likes to sit in your swing and practice her singing. She is very talented singer you know. Such a small baby girl, yet so smart and talented.
Me: ~trying hard to disguise the pain~ But Amma, you sure must miss talking to me.
Amma: Actually, I am so busy knitting new blanket for my baby girl that I hardly get time to miss you. She is a great company and follows me everywhere I go. Poor child, other night she woke us up at middle of the night. She was crying and wailing in her sleep. She must be missing her mommy. So we decided to let her take your room. And anyways, you won’t be coming for one full year. Well, I got to go now. It’s dinner time for Bubbly. She must be hungry by now. Don’t know where your dad is. I asked him to get a bottle of calcium tablets along with shampoo for Bubbly from medical shop. Oh, I must remind him to get that new food pack of food for her. You know Dentasticks or something like that which keep their teeth and gums healthy. Yeah, Pedigree one… Good night Sia. Give my love to Alimayya. Will talk to you some other time.
Me: ~Stares at the phone with puzzled and confused and $%^& look~

That is how I have been disowned by my own parents. The day I stepped into an international flight with tears in my eyes and pain of separation from my dear and near ones, my parents and this-janam-ka-dushmans a.k.a. my brother and sister, they steered their car to my cousin’s house to pick new member of the family, 5 weeks old Bubbly. When it comes to breed, Bubbly is doubly(?!) pure breed. Well, she is a cross breed of Dachshund mother and Pomeranian father and has thus inherited her mother’s body and her father’s ears and nose ;)

That auspicious Friday (auspicious because I decided to not just leave my parents home but also my country as my siblings keep reminding me) morning 5 weeks old white with block spots roly-poly came to our home with band and banners!!! Every dog has a day and this dog, oopsy Bubbly, sure has many days! I am not only disowned and replaced by a dog at home but I am forced to talk to her every time I call home. So the conversation between me my mother goes like this…

Call 1:
Me: Hi Amma… What’s up?
Amma: Bubbly won’t let me give her bath. I bought this new shampoo for her because the last one didn’t smell good! But now I can’t find her. She is hiding somewhere! I don’t know how she finds out that I am going to give her a bath!
Me: Err…

Call 2:
Me: Hi Amma… How are you?
Amma: Oh what can I say? Trust me, I didn’t worry so much when you were teenagers. It’s becoming difficult to manage the ever growing list of Bubbly’s admirers coming to meet her. You know our neighbour’s Tommy right? The very same dangerous Alsatian who barks non-stop? What a shameless dog!!! He jumped our 6 feet high compound wall other night. Thank god, Bubbly was sleeping inside that night!
Me: ~thud, thud, thud~ Censored~

Call 3:
Me: Hi Amma…
Amma: wait, Bubbly wants to talk to you. I will hold the receiver near her ears and you talk to her…
Me: But Amma…
Amma: Shhh… She is listening. Talk to her…
Me: Err… Bubbly… err… How are you?
Bubbly: Bow…wow…. Grrrrr… (Translates: Don’t you dare to come back. It’s my home now!)
Amma: Choo chweet. She knows that its you calling.
Me: Whatever…

And this week’s call:
Me: Hi Amma… How are you?
Amma: ~sob, sob~ Hello…
Me: What happened?
Amma: I don’t know what to say? ~sob, sobs~
Me: Amma, please tell me what happened?
Amma: Our Bubbly is pregnant. We don’t know who the father is…
Me: ~Thud, thud, thud~

So our dear, heartthrob of every male dog in our street/neighbourhood/city, Bubbly is turning 3 year old this week and also heavily pregnant with her first child. While my mom is taking good care of her first grandchild’s arrival I celebrated it with Baingan Ka Bharta. Please pray that all goes well with my sistahhhhh…. Mu ha ha ha…

Baingan Ka Bharta is hot favourite of mine when it comes to Aubergine/Eggplant dish. Wonder why it took this long for me to post this recipe. My Amma makes the best Baingan Ka Bharta back home where she roasts the eggplants on direct burning charcoal which gives it a very heady and smoky flavour. Here I grill it in my ancient gas grill and sometimes cook it in oven. Although the end dish is not as flavourful as the one roasted on charcoal it always gets thumbs up when I cook it for my friends. Like many other Indian foods, Baingan Ka Bharta also has zillions of recipes from different kitchens across the India. So here is one of those zillions of recipes for Baingan Ka Bharta.

Photobucket
Baingan Ka Bharta

Photobucket Print This Recipe
Baingan Bharta (Smoky and Spicy Mashed Eggplants)
Prep Time: 5 mins

Cooking Time: 30-35 mins

Serves: 3-4

Ingredients:
1 large purple Eggplant
1 large Onion, finely chopped
2 large Tomatoes, finely chopped
2-3 Green Chillies, finely chopped (Adjust acc to taste)
½ inch Ginger, finely chopped
4-5 cloves of Garlic, finely chopped
1 tsp Jeera/Cumin Seeds
½ tsp Roasted Cumin & Coriander Powder
½-1 tsp Garam Masala (Adjust acc to taste)
½ tsp Red Chilli Powder (Adjust acc to taste)
½ tsp Aamchur/Dry Mango Powder
½ tbsp Oil+ ½ tbsp Ghee or 1 tbsp Oil or Ghee
2-3 tbsp Coriander Leaves, finely chopped
Salt to taste
Photobucket
Baingan Ka Bharta

Method:
Prick the surface of eggplant with knife or fork which will help in even roasting of eggplants. Heat oven or grill and broil or grill the eggplant till its surface is wilted/charred and cooked, about 15-20 mins depending on the type of oven/grill you use. Or you can roast the eggplant on direct flame, on medium heat turning it around, till its surface is charred and the whole egg plant is cooked. This gives a lovely smoky flavour to the egg plant.
Place this grilled eggplant in a large bowl and cover it with a lid or cling film. Let the eggplant cool completely and sweat. Once cooled, peel the charred skin, stem and discard. Mash the cooked eggplant with a potato masher or by hand and keep it aside.
Heat oil and ghee in a pan and add cumin seeds. When it sizzles, add finely chopped garlic and sauté for 30 seconds. Now add finely chopped ginger and green chillies and sauté it for another 30 seconds on medium flame. Mix in finely chopped onion and sauté it on medium flame for 1-2 mins till it turns light golden brown in colour.
Now add garam masala, red chilli powder and cumin-coriander powder and sauté it for 30 seconds. Mix in finely chopped tomatoes and cook for 2-3 minutes on the medium flame till it releases its juice and turns pulpy.
Add mashed eggplant, dry mango powder and salt to taste and combine well. Let it cook on medium flame for about 10 minutes, stirring occasionally, till the whole mixture becomes little dry. This gives the second layer of smoky flavour to the eggplants.
Serve hot garnished with finely chopped coriander leaves and chopped red onion with any Indian flat bread or Rice and enjoy.


Note:
To get smoky flavour to the eggplant, place mashed eggplant in a wide plate and place a small steel bowl in a centre. Then place few pieces of burning coal in the bowl and pour 1 tsp of oil or ghee on it. Cover the plate with wide lid and let it rest for 2-3 mins. This is the simplest way to get smoky flavour to your Bharta.
Insert 3-4 small garlic cloves in the eggplant by making small slit and roast it on the oven or on gas fire. The garlic inserted will get roasted along with the eggplant and gives it wonderful aroma and flavour.

Continue Reading...


Wednesday, 5 November 2008

Creamy Mushroom-Matar Curry


Creamy Mushroom-Matar Curry

How many days or hours have you spent cooking in your mom’s kitchen before you left to pursue higher education or got married and moved to different city/state/country? I am talking about whole cooking process which includes peeling, trimming, chopping, grinding, cooking and also cleaning the whole mess you have made. Is it years, months, weeks, days, hours or just few minutes?

If I were to include everything, then the fingers in my hands will be enough to do all the calculations. Growing up in India, kitchen was my Amma’s territory. Sometime I would help my mother in peeling the potatoes or chopping the beans. Other times I helped her in roasting the spices and grinding them. And when I was too lazy to do anything I declared myself as a certified quality control officer by tasting and testing for salt and spices. And embarrassingly I was not even good at that as many a times I failed to figure what was missing in the dish; whether it needed a sprinkle of chilli powder or dash of lemon juice. ‘Little bit of this and little bit’ of that is what we call ‘andaJu or andaz in cooking’ and little did I know it all comes from experience!

After moving to UK and sampling few foods cooked by my dear husband I realised that I needed to improve my culinary skills if I were to eat different kinds of food which will also taste differently. Krish is a good cook but his culinary skill is limited to making a bowl of Rasam and Sambar using the same curry powder which was used in almost all the curries he made. I can’t blame him completely as his pantry was stocked with a bottle of all purpose curry powder, dried Italian herbs and a jar of dried coriander leaves. You can hardly cook any curry with them, let alone authentic ones. That was the time I decided to learn cooking seriously. To my surprise I was blessed with beginners luck when it came to cooking and luckily some how most of the things I cooked tasted good if not best. After countless late night overseas SOS calls, few burnt pans and some over cooked veggies with little extra dose of spice and salt, I was blessed by goddess Annapurna and rest all, as we say, is a history.

Today when I cook I can’t help but think of my the initial days of cooking adventures. I can see the improvement in the way I cook and the way the food tastes. Gone are the days of hesitating and confused girl who spent half the time refering particular recipe on cookbook or website. Today in her place I see a person who is confident enough to use and change the ingredients which she knows will enhance the flavour. There is a girl who is not afraid to try her own recipes, using whatever is available in her fridge-freezer and pantry and still be assured that it would be well accepted by her family and friends! So do you see that girl in your kitchen too? Do share your stories with me…

Today’s recipe of Creamy Mushroom-Matar Curry is a result of my successful cooking experiments which seems to be increasing these days. This is a rich, creamy dish of sweet green peas and delicious mushrooms cooked in wonderful gravy of onion, tomato and cream or milk. The ground onion paste along with ginger-garlic and red chillies gives a lovely creamy texture to the gravy and hence the cream used in it can easily be forgotten.

Creamy Mushroom-Matar Curry

Photobucket Print This Recipe
Creamy Mushroom-Matar Curry (Delicious Mushrooms and sweet Green Peas cooked in a creamy and spicy gravy of Onion, Tart Tomatoes and Cream or Milk)
Prep Time: 10 mins
Cooking Time: 20-30 mins
Serves: 4-6
Ingredients:
15-20 Button or Close cupped Mushrooms, cleaned, pat dried and quartered
¾ cup fresh/frozen Green Peas
2-3 tbsp fresh Cream or ½ - ¾ cup Milk
1 cup Onion, finely chopped
3 large Tomatoes, pureed
3-4 Garlic Flakes, thinly sliced
1 inch Ginger, finely chopped
3-5 Dry Red Chillies, halved (Adjust acc to taste. Preferably Byadagi or Kashmiri Chillies)
½ tsp Garam Masala
½ tsp Kitchen King Masala (Optional)
¼ tsp Aamchur/Dry Mango Powder or ½ tbsp Lime Juice (Adjust acc to taste)
1 tsp Sugar (Optional but recommended. To help in balancing the tart taste of tomato)
1+1 tsp Jeera/Cumin Seeds
1 + ½ tbsp Oil/Ghee
Salt to taste
Creamy Mushroom-Matar Curry

Method:
Heat ½ tbsp of oil in a pan and add a tsp of cumin seeds to it. When cumin starts to sizzle and turn reddish in colour, add finely chopped garlic and ginger to it. Sauté on medium flame till the garlic turns light golden on the edges.
Now add finely chopped onions and halved red chillies and sauté till onion turns light golden, about 2 minutes. Switch off the flame. Once the onion mixture has cooled a bit, grind it to a smooth paste without adding any water to it.
Heat a tbsp of oil in a pan and add a tsp cumin seeds to it. Again when cumin starts to sizzle and change in colour, add ground onion paste to it and fry till the whole mixture becomes dry, about 4-5 minutes, on medium flame. Make sure that the ground onion mixture turns little brown in colour.
To this, add garam masala and kitchen king masala and fry for half a minute. Mix in quartered mushrooms and sauté for 2-3 minutes. Add tomato puree, green peas, cream/milk, dry mango powder and salt to taste and mix well. (If using just cream, add ¼ cup of water to the pan.)
Simmer the flame and let it cook covered for 10 minutes, stirring in between. Add little more water or milk if needed to get the required consistency of gravy and adjust the seasonings. Then remove the lid and let it cook for another 5 minutes for all the flavours to blend well.
Serve it hot, garnished with finely chopped coriander leaves, with any Indian flat breads or flavoured Rice and enjoy.

Continue Reading...


Thursday, 30 October 2008

Stuffed Bhindi Masala: My Okra Love Affair


Stuffed Bhindi Masala
Remember me?
It’s great to see you after all these years.
Can we be friends?
Your profile is so cute. I would love to add you as friends.
Are you so-and-so?
Aren’t you so-and-so’s cousin or friend?
Wondering what’s this all about? Well, these are the friendship requests I get on social networking sites. Some are from old friends whom I have almost forgotten and some from total strangers and some simply wanting to increase the number of friends in their profiles and some from lonely guys and girls seeking ‘real fun’ (Duh?!). Having it said, these social networking sites are really cool as I got to meet my long lost (not at your usual Kumbh ka Mela ;) friends all around the world. I always believed I had just few friends until I saw my friends list crossing 3 digits and then hitting close to three centuries. Now who would have thunk I made so many friends over all these years.

Well, meeting all these friends also means travelling back in time and remembering and sometime painfully reminding all those funny and embarrassing moments. Most of my recent friends think me to be a no-nonsense, serious kind of person to walk on this planet. Imagine their shock when they read my primary school friend’s message with bold letter flashing on my scrapbook asking me if I still play pranks on my boss or colleagues as I used to do with my teachers by placing the duster or the most common trick of spilling ink on their chair and snatch my colleagues lunch box as I did to my juniors and classmates. And an enthusiastic scrap left by my close friend about hitting that pimple faced boy with my metal compass box for teasing me for wearing gaudy pink lipstick and matching nail polish in my high school was enough to shake the foundation of my sophisticated image that I had built (but not completely succeeded is another matter all together). And one friend decides to write a long testimonial on how smart I was to mix hair remover solution and face bleach cream with shampoo to teach a unforgettable lesson to our hostel warden for stealing my favourite shampoo and that piece of information was enough to make me turn from serious working girl into a total prankster! My close friends are hell bent on spoiling all my reputation. ~sighs~ I say friends can also be your worst enemies (I can prove it, may be in another post) but they are the kind whom you cherish.

When people compare marriage to chewing gum, I couldn’t help but compare friendship to Okra. I know it sounds weird but I can be weird sometime! ;) You see my theory comes from the fact that Okra can be annoyingly slimy yet it tastes delicious when cooked right. Similarly friends can be annoyingly irritating yet they are the best part of your life. ~clap, clap or slap, slap~ Whoosh… Ok, I made that all up as today we have this lovely Okra or Bhindi recipe. So no need to break your head on the weird comparison of Okra and friendship. Without much delay (!!??) let us go to the recipe bit.

By now the regular reader of my blog would have realised how much I love Bhindi. This time I am posting a recipe of Stuffed Bhindi Masala which I cooked last night without following any recipe in particular. I used the ingredients which I thought would enhance the flavour of Bhindi and pleasantly they did. By the time I finished stuffing and sautéing, one quarter of the stuffed okras were stuffed in our mouths. Since I had already sliced the onions and chopped the tomatoes I had to use them in cooking. May be next time I will just stuff the okras and simply stir fry them or bake them. The stuffing used is roasted peanuts and few spices which gave pleasantly nutty flavour with touch of spiciness to sweet okras. While onions add more crunch and sweet note, tomatoes lends lovely tangy flavour to the dish. Try this recipe when you have time and see how okra can beat any vegetables hands down when cooked right.

Stuffed Bhindi

Photobucket Print This Recipe
Stuffed Bhindi Masala (Okra stuffed with roasted Peanut and Spice powder and cooked with sweet Onions and tangy Tomatoes)
Prep Time: 15-20 mins
Cooking Time: 20-25 mins
Serves: 4-5

Ingredients:
24-30 tender baby Okra/Bhindi (1 and half to 2 inches long) or 18-24 tender Okra, tips removed and cut into 2 inch pieces
1 large Onion, halved and thinly sliced
2 large Tomatoes, finely chopped
3-4 Garlic cloves, finely chopped
2 Green Chillies, slit (Adjust acc to taste)
1 tsp Jeera/Cumin Seeds
Few Curry Leaves
1 tbsp Lime Juice (Optional)
2 tbsp Fresh Coriander Leaves, finely chopped
2-3 tbsp Oil

For Stuffing/Filling:
¼ cup Roasted Peanuts
1 tbsp Channa Dal/Split Chickpeas
1 tsp Jeera/Cumin Seeds
½ tbsp Coriander Seeds
4-5 Dry Red Chillies (adjust acc to taste)
¼ tsp Hing/Asafoetida
1 tsp Amchur/Dry Mango Powder
½ tsp Turmeric Powder
Salt to taste
Stuffed Bhindi Masala

Method:
Wash okras and spread them on dry kitchen towels to remove excess water or simply pat them dry with kitchen towel.
While the okras are drying, heat a pan and dry roast channa dal, dry red chillies, hing, jeera and coriander seeds till they turn golden red and fragrant. Let them cool completely before you powder them. Add these roasted spices with roasted peanut, turmeric, amchur and salt to taste and grind them to coarse powder.
Now trim the okra ends and carefully make a slit on one side and stuff it with ¼-½ tsp of spice powder. Don’t worry if you are left with excess spice powder as it will be used later.
Heat about tbsp of oil in a pan and sauté stuffed okras on high flame, if required in batches, for about 4-5 minutes till brown spots start to appear and it is half cooked. Place them on paper towel till needed.
Now heat another tbsp of oil in a pan and add cumin seeds to it. When jeera starts to sizzle and turn light shade of brown, add curry leaves, finely chopped garlic and slit green chillies. Sauté till garlic turns light shade of brown, about one minute.
Add thinly sliced onion and sauté on medium flame till it turns golden brown, about 3 mins. Mix in finely chopped tomatoes and remaining spice powder and cook till tomatoes release it juice and turns pulpy, about 3 minutes.
Now add stuffed okras and sauté for 5-7 mins on medium flame till the okra is cooked through and the flavours blend well.

Continue Reading...


Tuesday, 21 October 2008

Chavli Amti: Recipes from Your Kitchen to Mine

Photobucket
Roasted Spices for Amti Masala

Yes, it’s a time for this month’s “Recipes from Your Kitchen to Mine”. This month I have tried 2 recipes from different blogs and if time permits I will post the second recipe before the clock strikes 12 on 31st October. So today I am posting a recipe I tried from Nupur’s One Hot Stove.

Nupur’s One Hot Stove is one of the inspirational blogs where she takes us on virtual culinary journey of authentic and delicious Marathi cuisine. Coming from a beautiful city of Kolhapur, Nupur warmly welcomes us to savour simple yet heavenly home food which she grew up enjoying eating and later creating the same magic in her kitchen. Well, I don’t think I need to write more about Nupur or her blog as most of us visit her very often to see the Marathi culinary gems she churns from her One Hot Stove.

On one of such visits I stumbled upon delicious looking Chavli Amti. Amti is as dear to Maharashrtians as Rasam is to South Indians. I have come across many recipes of Amti in last two years of blogging but surprisingly never ventured into making it till now. Since I am quite partial to Black Eyed Peas these days, I couldn’t resist the temptation of trying her Chavli Amti. Well cooked plump black eyed peas in delicious creamy coconut, onion and tomato gravy was something which is hard to resist. And with freshly made batch of Amti Masala from her blog it was everything any true foodie can think of.

Except for the soaking bit I followed Nupur’s recipe without twisting and tweaking. In recent experiment with cooking the black eyed peas in Methi Lobia, I have learnt that black eyed peas can be directly cooked without soaking them overnight. Since I had few other things to do, I could soak these beans for 2 hours and it came out just perfect when pressure cooked. So don’t worry if you don’t have time to soak the peas in water. Just bring a pot of water to a boil and add these beans. Cover and pressure cook for 15 minutes till they get nicely cooked and plumped. The freshly ground Amti Masala is sure to find its way into many other recipe I am going to cook. As Amti Masala doesn’t contain over powering spicy ingredients, it is just perfect for the recipes which needs little kick of aromatic, fresh spice powder. Roasting of lentils and spices along with onion and coconut simply jazzes the whole dish and gives creamy base gravy with a touch of sweet and nuttiness. I made it little thick on first day to go with fresh batch of Phulkas and added little more water on next day to get thin gravy to serve with a pot of steam cooked rice and needless to say we licked our fingers and plates clean ;) Thank you, Nupur for inspiring me to cook this extra ordinary dish which has become talk of our home :) This is my third and final entry (I hope so;) for dear Sra’s My Legume Love Affair-Fourth Helping, initiated by lovely Susan. Well, this should show my love affair with legumes and lentils, I think ;)

Photobucket
Chavli Amti

Photobucket Print This Recipe
Amti Masala Powder
Prep & Cooking Time: 5 mins
Makes: ¾ cup
Shelf Life: 3 months
Recipe Source: One Hot Stove

Ingredients:
½ cup Coriander Seeds
¼ cup Jeera/Cumin Seeds
2 tsp Shah Jeera/Black Cumin Seeds
1 inch Cinnamon Stick
10 Cloves
Photobucket
Freshly Ground Amti Masala


Method:
Dry roast all the ingredients in a pan at medium-low heat till they change colour to lovely golden red and fragrant. Let it cool completely before you proceed.
Grind these roasted spices to smooth powder and store this aromatic Amti masala powder in an air tight jar or container and use as and when needed.

Photobucket
Chavli Amti

Photobucket Print This Recipe
Chavli Amti (Black Eyed Peas in delicious spiced gravy of Coconut, Onion and Tomato, a recipe from Maharashtra)
Prep Time: 10 mins
Cooking Time: 30 mins
Serves: 4-6
Recipe Source: One Hot Stove

Ingredients:
1 cup Black Eyed Peas, washed and soaked in a bowl of water overnight
1 medium onion, thinly sliced or finely chopped
2 large tomatoes, pureed or finely chopped
1½ tsp Amti Masala Powder or use any Curry Powder of your choice (Garam masala, Sambar masala etc)
1 tsp Jaggery/Sugar
Salt to taste

For Masala Paste:
1 tsp Urad Dal/Split Black Lentils
1 tsp Channa Dal/Split Chickpeas
1 tsp Coriander Seeds
½ tsp Methi/Fenugreek Seeds
1 tsp Jeera/Cumin Seeds
3-4 Dry Red Chillies (Adjust acc to taste)
1 small Onion, finely chopped
3 tbsp grated Coconut, fresh or frozen or desiccated
½ -1 tbsp Oil

For Tadka/Tempering:
½ tbsp Oil
1 tsp Mustard Seeds
Few Curry Leaves
A big pinch of Hing/Asafoetida
½ tsp Turmeric Powder

Photobucket
Chavli Amti

Method:
Cook soaked beans along with the same water used in soaking in a pressure cooker for 10-15 mins till it is cooked thoroughly. I soaked these peas for about 2 hrs in water and cooked them in pressure cooker. Alternatively if you don’t have enough time to soak the peas in water, bring 2-2½ cups of water to boil in a pressure cooker and to this add washed beans. Cover the pressure cooker lid and proceed to cook for 15 mins or for 3 whistles. Let the pressure cooker cool slightly and let it release all its pressure before opening the lid to avoid nasty accidents in your kitchen.

For Masala Paste:
While black eyed peas are cooking, add all the ingredients listed under the masala paste ingredient list in a pan and fry them in a little oil till they are lightly roasted, about 2-3 minutes on medium flame.
Switch off the flame and let the spices cool slightly. Grind it to a smooth paste by adding little water at a time. Keep it aside until required.

Proceed to make Chavli Amti:
Heat oil in a pan and add mustard, hing, curry leaves and turmeric powder in that order and let the mustard pop and splutter. To this add finely chopped/sliced onions and sauté till it turns golden brown, about 2 mins.
Now add chopped tomatoes or tomato puree, sugar, amti or other curry powder, ground masala paste and salt to taste. Fry this on medium flame for another 2-3 mins.
Add cooked black eyed peas along with the water in which it is cooked and bring the whole mixture to a boil. Add little more water if needed and simmer for another 5-10 minutes. Serve it hot garnished with finely chopped coriander leaves along with roties or steaming bowl of rice and enjoy.

Continue Reading...


Tuesday, 23 September 2008

Paneer Makhani/Paneer Butter Masala for Second Blog Anniversary Celebration

Photobucket
Paneer Makhani/Paneer Butter Masala

Yes, tomorrow it will be 2 years since I created this blog and I did pinch myself to make sure I was not dreaming. For someone who loves changes and new adventures in life I have impressed and surprised myself by sticking to this blog for last 2 years. What a fabulous journey it had been…

Were you aware of the fact that I created this blog out of boredom?! Yup, that’s me; totally unpredictable and bit wacky ;) Moving to complete new and different country with new challenges to face upon, I had no idea what I wanted to do. From being a centre of attention among family and friends, I was pushed to face the new world filled with strangers on one of the peak winter days and for a tough shelled Cancerian it was not really an exciting prospect. I hid myself in a tough shell to protect myself from bitter cold days and I would have been hibernating there for very long time if not for this golden sunshine in the form of Blog world. That was when I started my personal blog Crabby Bites, expressing each and every emotions of daily life. It was just few weeks later I started writing few recipes learnt from my Amma, Ajji, Atte and aunts, a personal copy of recipes which served as reference while cooking. Soon I realised I needed new space dedicated to recipes and hence Spice Corner, now known as Monsoon Spice, was born.

It was my space, my corner where I started posting recipes for myself. Few days after that I received a very first comment from someone I didn’t know. That is when I realised there was someone out there who didn’t know me, but still they were moved enough to reach out and leave their trail. Today, even after 2 years of blogging whenever someone leaves their small notes I can’t help but get the same thrill I got it for the first time. Strange world we live in! I feel connected with most of you whom I have never seen or met before. Through blogging I have met hundreds of thousands of wonderful people- bloggers, bakers, food photographers, writes, chefs, readers, and even virtual world strangers who have become real world friends. So thank you, thank you and thank you to all you wonderful people (both friends and strangers) who have left their mark in my small world. It was truly an amazing journey with you people who have injected more spice into my already spiced life ;) Once again, a heartfelt thank you to everyone who have left your trail here on Monsoon Spice!

Photobucket
Paneer Makhani/Paneer Butter Masala

A birthday celebration is not complete without delicious food. Being a spice lover I couldn’t convince myself to make any sweets or dessert and yup, opted for something which my darling guinea pig/lab rat loves ;) What he loves, he always gets and he loves Paneer Makhani or Paneer Butter Masala. This was my way of saying big Thank you to my much better half who patiently waits till I finish cooking and clicking without any complaints :) We rarely use Paneer in our kitchen but whenever we use it we make sure that it gets full credit. Paneer Makhani or Paneer Butter Masala is one such dish which is very rich and flavoursome. Use of cashews, poppy seeds and fresh cream makes this quite fattening but remember, this is once in a while indulgence. My recipe is very simple and straight forward. I use two different, flavourful pastes made using onions and tomatoes ground with few spices. Addition of Kasuri Methi and fresh cream simply jazzes up this already creamy delight. Make this curry when you want to celebrate some special occasions or indulge when you want to uplift your moods and I can guarantee that it will be one meal to that everyone will remember for very long time. Off this goes to Ruth who is guest hosting this month's MM-Sensational Sides, started by gorgeous Meeta.

Photobucket
Ingredients for Paneer Makhani/Paneer Butter Masala: Paneer, Kasuri Methi, Onion & Tomato Paste

Photobucket Print This Recipe
Paneer Makhani/Paneer Butter Masala (Fried Indian Cottage Cheese in a delicious Onion-Tomato Gravy)
Prep Time: 10 mins
Cooking Time: 25-30 mins
Serves: 4-5
Ingredients:
1 block Paneer, cut into 1 inch cubes (approx 2-3 cups, I used store bought)
2-3 tbsp fresh Cream (I used single cream)
1 tsp Sugar (Optional but recommended)
1 tbsp Kasuri Methi/Dried Fenugreek Leaves
1 tbsp+1 tbsp Oil/Ghee
2 tbsp Coriander Leaves, finely chopped
Salt to taste

Ground to Fine Paste:
For Onion Paste:
1 large or 2 medium Onions
½ tsp Jeera/Cumin Seeds
1 inch Cinnamon
3 Cloves
3 Green Cardamoms
1 Bay Leaf
½ tbsp Khus-Khus/White Poppy Seeds
3 cloves of Garlic
1 inch Ginger

For Tomato Paste:
1 can chopped Tomato/3 Large Juicy Tomatoes
10 Cashews
1 tsp Garam Masala
1 tsp Kitchen King Masala (Optional but recommended)
¼-½ tsp Amchur/Dry Mango Powder (Adjust acc to taste)
½ Turmeric Powder
½ -1 tsp Kashmiri/Deghi Chilli Powder (gives lovely bright red colour)
Photobucket
Paneer Makhani/Paneer Butter Masala

Method:
Heat 1 tbsp oil or ghee in a pan and add paneer blocks. Fry these pieces on both the sides till they turn golden, about 3-5 mins, and place them in a bowl of water for about 15 mins. It’s best to fry them in batches if you can’t fit them in a pan in single layer.
Grind onion and tomato paste with all the ingredients listed above to smooth consistency separately and keep it aside till required.
Heat another tbsp of oil in a same pan and add cumin seeds. When it starts to sizzle and turn light brown in colour, mix in onion paste. Keep stirring at medium heat till onion paste turns light brown in colour and becomes little dry, about 6-8 minutes. This is an important step as if the paste is not fried well it will make the gravy bitter. Make sure that you continously stir the paste and it doesn’t stick to the pan.
Now add kasuri methi and sugar and stir for another minute.
Mix tomato paste and stir well. Simmer the heat and let it cook for 4-5 minutes, stirring in between to make sure it doesn’t stick to the pan.
Increase the heat to medium and add a cup of water, salt to taste and mix well. Cover and cook for another 5 minutes. Open the lid and adjust the seasonings.
If you find the gravy too thick, add about another ¼-½ cup of water. Drain water and mix in fried paneer pieces and cream. Simmer the gravy and let it cook uncovered for another 5-7 minutes.
Switch off the flame and mix finely chopped coriander leaves. Serve it hot with any Roti or Jeera/Saffron Rice and enjoy. It tastes better the next day.


Other Paneer recipes blogged so far,

Continue Reading...