29 March, 2009

Tofu & Pineapple Thai Yellow Curry: Sunshine, at least, in My Bowl!

Photobucket

Tofu & Pineapple Thai Yellow Curry

Sunshine is delicious, rain is refreshing, wind braces us up, snow is exhilarating; there is really no such thing as bad weather, only different kinds of good weather.
~John Ruskin


25 March, 2009

Lauki-Lobia Curry: Fascinating Sprouts!


Lauki-Lobia Curry

You know what fascinates me? Life! Life as an individual’s journey on this planet, that begins with birth and ends with death. And according to Hinduism there is one more life, its life after death! Sometimes, I could be too philosophical with some random thoughts surfacing on idle days. I don’t want to go too philosophical today. But sometime I am called crazy for muttering my thoughts loud in front of my family and friends! Let us not go into that part now and concentrate on my today’s musings ;)


21 March, 2009

Methi Matar Malai: Green & Cream Indulgence

Photobucket

Methi Matar Malai

How many of you agree that curry powder that is sold in supermarkets in colourful plastic/glass container is nothing but much hyped saw dust?
I am really pleased to see most of you nodding your head in agreement :)


17 March, 2009

Bhindi Do Pyaza: Say No to Slimy Okra!

Photobucket

Bhindi Do Pyaza

What happens when you balance laptop in one hand, cloths basket in another hand, two coffee mugs dangling from fingers?
Well, nothing!
And imagine same scenario and you are climbing down the stairs, looking back and chatting away to glory?


12 March, 2009

Paneer-Matar Parathas: Frozen Food Lovers Delight!

Photobucket

Paneer-Matar Parathas

“The most remarkable thing about my mother is that for thirty years she served the family nothing but leftovers. The original meal has never been found.”
~Calvin Trillin


11 March, 2009

Malai Kofta: Temptress, Seductress and Highly Addictive!

Photobucket
Malai Kofta

“The way to a man’s heart is through his stomach”.

Do you know the origin of this theory? It is said that the American statesman John Adams wrote in a letter some where in early 19th century, “The shortest road to men's hearts is down their throats” and that's how this theory or statement was originated. So my question is how many of you believe in this theory? Does this statement hold true in your life?

When I think of 19th century I get these black and white images of that era flashing in front of my eyes where many men looked for good wife who would be a good mother to his children and take care of his family affairs. The fact that she could cook well was a good indication to her role of being a nurturer. Unlike our time where we have an option of marrying a person whom we know and eventually fall in love with them, it may have been the best way to please his stomach and work your way up in winning his heart in that period of time! Steaming pot of delicious food may make someone feel cared for by triggering their childhood memories of food served by their loving mother. I wonder if this feeling of satisfaction after been served a good food is mistaken for love!

Cooking is not just chopping, grinding or mashing and throwing everything into a pot and stirring. Any good cook will be able to tell you how much work is involved when it comes to cooking food for someone you care. The person who cooks for you at home knows what food you like, how you like it and when you like to have it. When I cook for someone I make sure that they will remember the food I cooked for long time, a very long time indeed! I choose the best of ingredients with care and use them in such a way that they leave lasting impression. Even everyday simple food served to my man is cooked with utmost care and love. There are no food games in my kitchen as the food should not only taste good it should also be good for you. Well, don’t we all agree that the food cooked with care and love not only will taste good, it will also make them feel cared for and make them feel at home?

We can also argue that food alone is not enough in making the relationship work between two individuals who think differently and have different opinions. There are few restaurants that serve the best food I have ever tasted. Does that mean I will fall in love with chefs just because he/she cooked one of the best meals I have had? I know for sure that the food is prepared with utmost care and to a very high standard. After all I am paying very high price for that plate of meal. In an end it is my man who cooks simple everyday Rasam and Dal whom I love. He may not be the best cook around but he has many qualities that made me fall in ultimate love trap :) It’s definitely not our cooking skills that made us love each other. Any relationship to go strong needs many other qualities in each other and not just our cooking skill. But yeah, we can’t rule out the fact that ability to cook good food will definitely help in nurturing the relationship. Remember, it’s just one of the things that can take you close to man’s heart! Not the ultimate one…

Photobucket
Malai Kofta

This is a good topic for discussion/debate and I have participated in many such discussions. Sometimes I agree with this theory and there are times when I have gone against it. We will continue to argue on this topic as long as there are people who love to cook and eat good food. So I can’t just come to a conclusion as whether I agree with it or not. But it would be great to hear from you as what do you think of it? So let’s hear from you guys…

While we are on this topic, let me share one of the ultimate food seductions. We have Malai Kofta in our menu today. Spicy dumpling of Indian Cottage cheese that is deep fried and served in delicious, creamy and spicy gravy of fresh cream and onion-tomato paste is nothing short of sinful indulgence. Try cooking it once and see your taste buds falling head over heels in love with this tempting Malai Kofta. Yes, Malai Kofta is a temptress, a seductress and highly addictive! ;) I am sending this to Lavi who is guest hosting this month's RCI-Lucknow, a wonderful event started by dear Lakshmi of Veggie Cuisine.

Photobucket
Koftas, Before & After Deep Frying

Photobucket Print This Recipe
Malai Kofta (Deep fried spiced Indian Cottage Cheese dumplings in creamy Onion & Tomato gravy)
Prep Time: 15 mins
Cooking Time: 45-60 mins
Serves: 6-8
Recipe Level: Intermediate to Difficult
Spice Level: Medium
Serving Suggestion: With any Indian flat bread or flavoured/steam cooked rice

Ingredients:
For Kofta:
1½ cups Grated Paneer
2 large Potatoes, cooked, peeled and well mashed
1 medium Onion, very finely chopped
2 tbsp Coriander Leaves, very finely chopped
2-3 Green Chillies, very finely chopped (Optional, adjust acc to taste)
1½-2 tbsp Gulab Jamun Mix/Milk Powder (Optional but recommend)
¼ cup Bread Crumbs
2-3 tbsp Corn Flour (Acts as a binding agent while deep frying)
1 tsp Garam Masala
½ tsp Amchur/Dry Mango Powder (Optional, for little tangy flavour)
6-8 Cashew Nuts, cut into small pieces (Optional but recommend)
1-2 tbsp Raisins (Optional but recommend)
Salt to taste
Oil for Deep Frying

For Gravy:
For Onion Paste:
2 large Onions, peeled and quartered
1 inch Ginger, peeled
3-4 cloves Garlic
1 inch Cinnamon Stick
3 cloves
3 Green Cardamoms

Other Ingredients for Gravy:
4-5 large Tomatoes, pureed
1 tbsp Cashew/Almond Paste
¼-1/2 cup Fresh Cream (I used low fat single cream)
1-2 tsp Garam Masala (Adjust acc to taste)
1 tsp Kitchen King Masala (Optional)
½ tsp Turmeric
½-1 tsp Kashmiri Chilli Powder (Optional)
1 tbsp Kasuri Methi/Sun dried Fenugreek Leaves
½ tbsp Sugar
1 tbsp Oil
1 tsp Cumin Seeds
A pinch of Hing/Asafoetida
Salt to taste
Photobucket
Malai Kofta

Method:
For Gravy:
Heat oil in a pan and add cumin seeds and hing. Add onion paste that you had prepared just when cumin starts to sizzle and turn golden red. Stir it continuously for 5-7 minutes till the paste turn golden brown and the raw smell of onion disappears. This is the very important step as you don’t want to rush and end up having bitter tasting gravy. So be patient!
Once the onion paste is cooked thoroughly add kasuri methi and sugar. Saute for a minute or two. Next add tomato puree and stir well. Cover and cook for about 5 minutes.
Next add garam masala, kitchen king masala, turmeric powder, Kashmiri chilli powder and salt to taste and mix well. Bring this whole gravy to gentle boil, about 5 minutes.
Mix in cashew/almond paste, fresh cream and ½-1 cup of water (depending how thick you prefer the gravy) and cook for another 5-7 minutes on low flame.
Adjust the seasoning and add little more water if the gravy is too thick and cook for another 2-3 minutes. Switch off the flame and mix in finely chopped coriander leaves.

For Koftas:
First, mix paneer with mashed potatoes, onions, coriander leaves and chillies. Make sure that the paneer and potatoes as lump free as possible. Then add gulab jamun mix/milk powder, salt to taste, garam masala, amchur powder, broken cashews, raisins, bread crumbs and corn flour to the vegetable-paneer mix and mix them well. Use hands when mixing all these ingredients and make sure that all the ingredients are mixed properly. The consistency whole mixture should be as that of chapatti dough and you should be able to make lemon sized balls without breaking them.
Next heat oil for deep frying and reduce the heat to medium to low flame. Make small lemon/golf sized balls and deep fry them in batches of 3-4 balls at time. If the koftas start to break, add 1-2 tbsp of corn flour to the mixture, mix them well and make small lemon sized balls. Fry them till they turn golden brown and crisp and place them in a bowl lined with kitchen towel to absorb excess oil.
Alternatively you can bake them in an oven at 175 deg centigrade for about 20-30 minutes or fry them in Appam Pan with little oil till they turn golden brown.

To Assemble and Serve:
Heat the gravy for few minutes and then transfer it to serving dish. Arrange the koftas in gravy and top it with finely chopped coriander levaes. Malai Kofta tastes best when served with any Indian flat bread (I prefer Naan) or flavoured rice like Saffron rice or Jeera Rice with slices of Onion and lemon wedges.

Photobucket
Malai Kofta


Notes:
When you deep fry the koftas, first make sure that the oil is hot enough before you place them for deep frying.
Place one kofta at a time in a pan when deep frying. If the Kofta starts to break or crumble add about 1-2 tbsp of corn flour and mix well. Corn flour acts as the binding agent and will prevent the koftas from breaking when deep frying.
Always fry the koftas in low-medium flame so that they are cooked well and get lovely golden brown colour.

06 March, 2009

Dahiwale Baingan: Less is More!

Photobucket
Dahiwale Baingan

Some times a bright sun beam escaping from grey clouds is enough to lift your mood…
Some times a small cup of coffee at the end of long, hectic day is enough to cheer you up…
Some times a funny forward in your email box is enough whisk away the blues…
Some times a smile from small baby is enough to wipe away the tiredness…
Some times a little card from your dear one is enough to brighten your day…
And some times a simple food is all we need to comfort us and make us feel at home…

Some times all we need is little things that make your day… Just small things that makes us happy and content!

Yes, today we are talking about simple pleasures of life today and also the theory of less is more. Food that we cook or eat everyday is no exception when it comes to simple pleasures of life. And to prove this age old theory, we have a very simple recipe that uses very few ingredients in creating one of the best tasting curries! I made this Dahiwale Baingan following the recipe posted by Saffron Hut. Saffron Hut was one of the very few Indian blogs I came across during initial days of my blogging and I was instantly hooked to her breath taking photographs and wonderful narration. I had bookmarked her recipe for Dahiwale Baingan, or to be precise, Sour Creamwale Baingan long back and almost forgot about it till yesterday. Why till yesterday? Well, yesterday was the first day in last three years of living here in UK that I came across this popular type of Eggplant that we grow in India. Yes, I got hold of the very old Chinese Eggplants I have been so craving for using in Vangi Bhath and Sweet & Sour Eggplant Palya. At last I found them in new Indian grocery in our city and came back home singing and dancing and all that goes with it! Did I hear some one say “What big show-off”? Well, then you definitely don’t have a clue about my love for these purple beauties! I call it simple pleasures of ‘my’ life…

After cooking and eating Vangi Bhath and Palya to my heart’s desire, I was left with three more Chinese Eggplants. One quick look into my bookmarks and I knew instantly what I wanted to try next. It was Dahiwale Baingan from Saffron Hut and I didn’t waste any time in creating this wonderful recipe. I followed her recipe to T except I used a combination of fresh cream and yogurt in place of sour cream. The end result was something that is hard to put into words! I have never thought simple recipe like this would turn into one of the best tasting eggplant dishes and trust me when I say I have tasted quite many recipes made using the king of vegetables. Thanks to Saffron Hut for making me believe once again that less is definitely more and tastier! Dahiwale Baingan is a simple dish of pan fried eggplants that had been marinated with ginger-garlic paste and salt and then mixed with sour and spicy yogurt gravy. Nothing fancy about it except it can give tight competition to any recipe that uses exotic and exclusive ingredients. Don’t you believe me? Then may be it’s time you tried this Dahiwale Baingan for your self and please let me know how you liked it.

Photobucket
Dahiwale Baingan: Work-in-progress

Photobucket Print This Recipe
Dahiwale Baingan (Pan fried Eggplants served with creamy gravy of Fresh Cream and Yogurt)
Prep Time: 5 mins (excluding marinating time)
Cooking time: 30 mins
Serves: 4-5
Recipe Source: Saffron Hut
Recipe Level: Easy/Beginner to Intermediary
Spice Level: Low to Medium
Serving Suggestion: With any Indian flat bread or flavoured/steam cooked rice

Ingredients:
3-4 long Chinese Eggplants (slit in middle and cut into 1cm half moons)
1 large Onion, finely chopped
1 tbsp Ginger-Garlic Paste
3-5 Green Chillies, finely chopped (Adjust acc to taste)
½ tsp Turmeric Powder
2 tbsp Fresh Cream (I used low fat single cream)
¼ cup Yogurt
Salt to taste
2-4 tbsp Oil

For Tadka/Tempering:
1 tsp Jeera/Cumin Seeds
1 tsp Mustard Seeds
Few Curry Leaves
A pinch of Hing/Asafoetida
½-1 tbsp Oil
Photobucket
Dahiwale Baingan

Method:
Rub little salt and ginger-garlic paste to cut eggplant paste. Make sure that you mix them well. Place these eggplant pieces in a colander for 1-1½ hours to marinate. Make sure that you place it near sink as the liquid generated from salted eggplants will drain away. You can also place a bowl filled with water on top (that fits within the colander) which helps in draining more bitter juice from eggplants. Once the juice is drain out, the eggplants fried up very well.
Pan fry these marinated eggplants in little oil, on medium to high heat, till they turn brown and crisp. It’s best to fry them in small batches so that you get evenly fried eggplants. Place them in a plate lined with kitchen towel till needed.
Heat oil in a pan and add mustard seeds to it. When mustard starts to pop and splutter, add cumin seeds, curry leaves and hing. Saute till cumin turns golden red. Mix in finely chopped onion and green chillies and sauté till onion turns translucent, about 3-4 minutes.
Add turmeric powder and sauté the onions for another 2 minutes. Mix in fresh cream and yogurt and reduce the heat to low. Keep stirring the cream and yogurt for another 3-4 minutes and bring it to gentle boil. Switch off the flame and mix in pan fried eggplants and serve this delicious Dahiwale Baingan immediately, garnished with finely chopped coriander leaves, along with chapattis or Roties and enjoy.

Photobucket
Dahiwale Baingan


Note:
It is important to marinate the eggplants for at least one hour before you pan fry. It not only helps in draining the bitter juice from eggplants, it also helps in frying them quickly and evenly.
Next time I might bake the marinated eggplants than pan frying. To do this, simply line the baking sheet with aluminium foil or parchment paper and spray little oil on top of it. Arrange eggplant slices in single layer and bake them till they are nicely browned.
Use pan fried Okra/Bhindi/Ladie’s Fingers in place of eggplants and follow the recipe for Dahiwale Bhindi.

02 March, 2009

Poolish Focaccia: My Story about... "Doing It"!

Poolish Focaccia

Should I do it today?” she thought to herself. “May be it’s not a good idea. What if I am misunderstood? What if everything goes wrong? Will I be able to show my face to him if I don’t succeed? What will he think of me? What if he thinks I ruined his reputation? What will his people say?” She was left alone to fight her own battle.

No, I can’t shy away from him anymore” she said loudly. It was at that moment she decided enough is enough. She was tired of longing for him, tired of waiting and watching and wanting. She knew she has to do something about it right then to stay sane! She couldn’t remember the last time she attempted something as brave as this. It felt like it was in another lifetime, in another world. Yes, not in this life and she had to do something about it.

She took a deep breath and got up from where she was sitting. She felt a shiver run down her spine and also adrenaline kicking her blood stream at the same time. She felt light headed and exhilarated at the thought of ‘doing it’ with him which surprised her nevertheless. Wasn’t she supposed to feel nervous and scared for doing it for the first time?

Then she took small steps in the beginning, almost hesitatingly. Then she remembered the anguish and pain of not ‘doing it’ and she didn’t want to live regretting for not ‘doing it’ life long. Her tentative steps increased their pace and with in few minutes she was standing facing his parents’ door. She took a deep breath and opened their door bracing her self for any challenge she might have to face.

Then she saw them, sitting quietly and giving her hard and cold stare. She could feel uncertainty creep her thoughts. She could see the rejection in their eyes and she wanted to give up everything and run back to her sanctuary to lick her wounds in her safe domain. But going back was not an option. She had faced rejection from their all her life and she had had enough of it and this was her ultimate revenge for making her suffer all this time.

Half in doubt, she slowly extended her hands towards them. She could hear her heart beating fast and small drops of sweat forming on her forehead. Once she touched them, she felt they were not as bad as she thought them to be. Surprisingly, the feeling was mutual and with in no time they could feel the sweet bond forming among themselves and they set the house literally on fire.

It may have taken quite sometime for her to at last meet him but the long journey she had to make was all worth in the end. And as they say, all’s well that ends well. She had ultimately conquered her fear and ‘did it’. The success tastes better and means lot when you wrap your fear in confidence and move forward with determination. Her story of ‘doing it’ also had a very happy end. Just like fairy tales…

And that’s how ‘did it’, my friends.
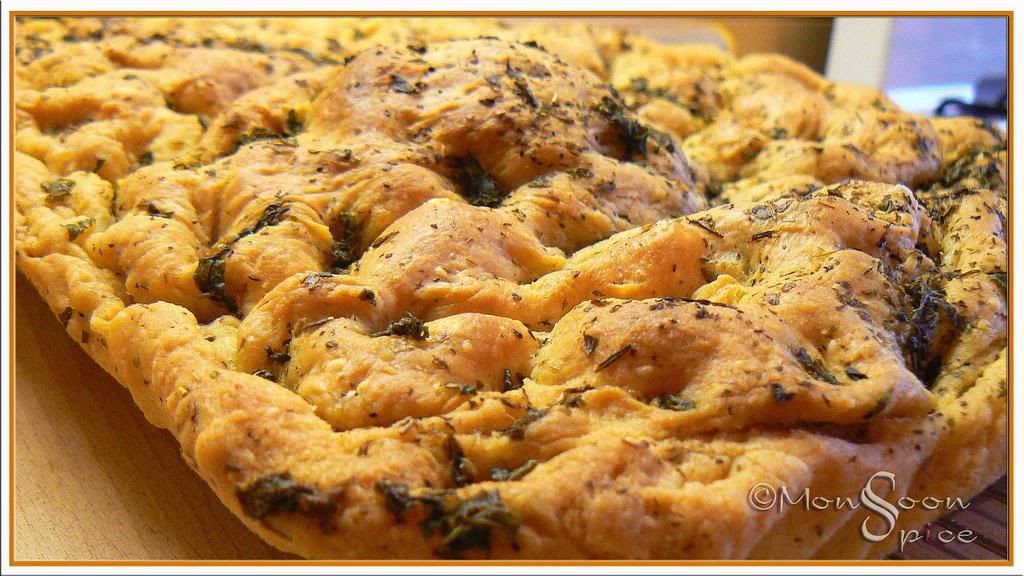
 I baked bread!

I baked bread from scratch. And boy!!! Does it make you feel high! I followed Lolo’s Poolish Focaccia and Poolish from scratch. It is not exactly a complex recipe to follow but it does test your patience as it takes 2 days. First day you prepare the poolish which needs you to mixing the flour, water and yeast and letting it rest overnight to ferment. And on second day the dough and herb oil is prepared for the focaccia. I have almost followed Lolo’s recipe to T. I lost all the step-by-step photos I had taken among thousands of other photographs (Arrgh.!!!...). So goto Lolo's blog for step by step gorgeous photos which are visual treats Without wasting much of your precious time, let me give detailed instructions for making your own Poolish Focaccia.

Day One: I followed Lolo’s instructions and made poolish on the night before baking. She did mention that you can make focaccia without this step but as it was the first time I tried baking bread, I didn’t want to leave option of getting perfect one. You don’t need to be a rocket scientist to make poolish. All you need is little time and the following ingredients.

Poolish Focaccia

Photobucket Print This Recipe
Poolish
Prep Time: 10 mins
Cooking Time: -
Makes: About 2-
2 ½ cups of Poolish

Ingredients:
2 ½ Cups Unbleached Bread Flour
1½ Cups Water, at room temperature
¼ tsp Instant Yeast (I cheated and used good ½ tsp yeast ;)
Method:
Take wide mixing bowl and add all the ingredients. With a help of a wooden spoon combine them to form a sticky and smooth mass which looked like a pancake batter. Cover it with a cling film or plastic wrapper tightly and leave it for the yeast to kick in.
Now either you can leave it out all night or store it in refrigerator after 4 hours. Since I had no plan of waking up at 2 in the night, I left it outside all night. This way my poolish was nicely and steadily fermented and it was bubbly, sticky and little stinky too ;)

Day Two: This was the D-day. I had to make dough and herb oil for focaccia. I could feel butterflies in my belli. But Lolo’s instructions assured me enough to plunge into baking spree. So this day I had to combine the poolish prepared last night with some extra flour to make dough for focaccia. And then I was all set to make very fragrant herb oil. The whole process of making the dough was simple enough than I thought it to be. All I had to do is mix the poolish with more flour, water, oil, yeast (the beast;) and of course salt. Yup, simple and straight forward. But then I felt I was back in acrobatics class when I had to fold the dough 3 times (standing in odd positions, and making all sorts of face), and had to wait for the dough to rise between every foldings. Once the dough has risen, I had to transfer it onto a baking sheet (thank god, no was there to watch me in awkward positions ;) and shape it to fill the whole of baking sheet. Then again leave to for its final rise before baking it. Over all it took 4-5 hours (I told you so, you need good amount of patience), but most of it was the rising time between every fold. I can see you yawning there. Hello… Wake up… Time to make Poolish Focaccia.

Poolish Focaccia

Photobucket Print This Recipe
Poolish Focaccia
Prep Time: 15 mins- 5 hours (Including Resting & Rising time)
Baking Time: 20-25 mins
Serves: 6-10
Recipe Source: Vegan Yum Yum

Ingredients:
3 Cups Poolish
2 2/3 Cups Unbleached Bread Flour
1½ tsp Instant Yeast
6 tbsp Olive Oil (I used good extra virgin Olive oil)
¾ Cup lukewarm Water
½ Cup Herb Oil (recipe follows)
2 tsp Salt or to taste

For Herb Oil:
1 Cup Olive Oil, little warmed (I used good extra virgin Olive Oil)
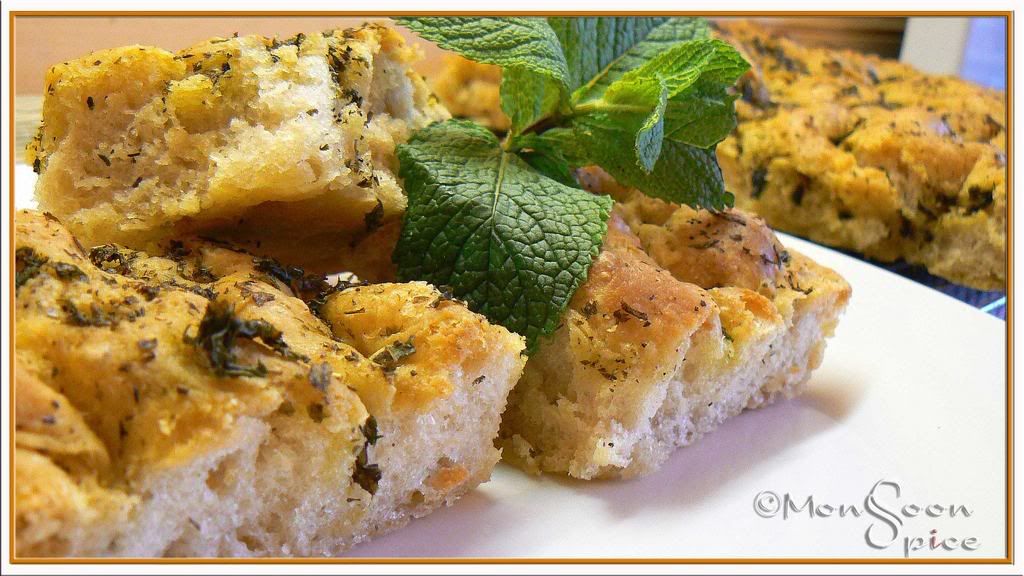
½ Cup freshly chopped or 2-3 tbsp Dried Herbs of your choice or combination of fresh and dried ( I used fresh mint and basil and dried mixed herbs and rosemary)
Poolish Focaccia

Method:
If you have refrigerated your poolish, make sure that it is kept outside for at least one hour to come down to room temperature. Once it is warmed enough, proceed to make the dough.
Take a large mixing bowl and mix in the flour, salt and yeast. Now add the poolish along with water and oil given in ingredient list.
If you are using all those muscle power like me, then be prepared for good 10-15 minutes of mixing and kneading. You need to get smooth and sticky dough. So start mixing and beating the dough till your arm aches and mind goes bonkers! The dough will be very sticky and it will stick to the mixing bowl like clinging baby to his/her mother. Since I don’t have machine I can’t really tell you how to do it. So please head over to Lolo’s website for further instruction on using machine to make the dough.
Next thing is to stretch and fold the dough. Use your work surface for this step by dusting it well with flour. Please be little generous with the flour (not too much also) if you don’t want to end up scraping your work surface for next one hour. Now scrape the dough from mixing bowl and dump it on the bed of flour. Sprinkle the top of the dough with flour.
Start patting the dough to get a rectangle shape. Lolo says patting the dough serves three purposes: one it pushes the dough into a rectangle shape, distributes the flour and also removes the excess flour. Let the dough rest for 5 minutes (and you too, but remember just 5 mins OK?)
After 5 minutes, you’ll need to fold the dough like letter. That is in equal 3 parts. First pick up one side of the dough (it will stretch a lot and make you wonder how many strong words you know ;) Be quick when you fold the sides of the rectangle because the quicker the movement, the easier it will be. Repeat with the other side of the dough. You will end up having small rectangle with folds that looks like folded letter. This is your first fold and remember, we have 2 more folds to come after this. Every time you fold, the dimension of the dough should remain equal. Did you just ask how? Well, after the first fold, you will be stretching the dough out and then folding it back again. Hence, you are not folding the dough into smaller rectangles, but stretching it out and folding it back to make equal sized rectangles. Confused? Don’t worry. You will understand it as we proceed.
Next, brush or spray the dough with oil, cover it in plastic warp and let it sit for half an hour. And then you’ll fold the dough again, brush it with oil, cover it with plastic wrap and let it rest for 30 minutes and then fold it again for the third and final time. Each time you fold, it becomes easier to handle the dough. And every time you fold, make sure that you are folding it in the opposite direction than the last. For example, for the first time if you have folded it from left to right, the next time you will fold it from top to bottom.
After the third fold, let the dough rest, covered with plastic warp, for one hour. The dough will rise at this time, but not necessarily double in size.
While the dough rests, we can proceed to make Herb Oil. It’s very simple and straight forward. Warm the olive oil and mix in all fresh or dried herbs or combination of both. Turn off the heat and let these aromatic herbs infuse the oil.
Now it’s the time to prepare your baking tray for baking Focaccia. Take 17” x 12” baking pan with sides and place a layer of parchment sheet. Spray oil on the baking sheet. Carefully transfer the dough from the counter to the baking sheet, try to maintain the rectangle shape. Don’t worry if the dough stretches little bit as the dough is quite soft and unwieldy.
Pour about ¼ cup of Herb Oil that you had prepared earlier on the top of dough. Now it’s the time for some fun. Using only your finger tips begin to press the dough to distribute the oil and flatten the dough out. The dough will begin to spread out in the pan. The aim is to spread the dough evenly, so that it fills the pan. But don’t worry too much if it doesn’t happen as the dough will gradually spread out in the pan after final rise. And important thing to remember is to use just your fingertips to spread the dough and not your fingers or palm. And also you want to keep the majority of air bubbles that forms on the dough which otherwise will not happen if you use your palm and knead it and destroy all your hard work.
Please make sure that the dough is completely covered in oil. Next cover and let the dough rise for two hours. I promise you, this is the final rise. By the end of two hours, the dough will be very puffy with bubbles and have had filled the pan. Close to the end of this final rise, preheat the oven to 500 deg F. make sure that the rack is placed in the centre.
While the oven is getting heated, add another 1/4 cup, or more, of the herb oil. Spread the dough out to its final size using the same fingertip technique that we had used. It’s a pretty sight to see all those bubbles but restrain your self from pinching them. You want a uniform distribution of bubbles and fingertip dimples. Pinch off any huge bubbles since they’ll just explode in the oven while baking. Sprinkle the top with salt as desired.
Tada… It’s baking time now. Oops, I forgot about another rest time. Promise, promise! This is the last and very final one. Let the dough rest for another 10-15 minutes. And then place the dough in the oven, turning down the temperature to 450 deg F. Bake it for 10 mins, rotate the sheet for even baking and then bake for another 10-15 mins until its golden brown. By then your whole house will smell of freshly baked bread with heavenly aroma of herbed oil. Just imagine that!!!
Now it’s the time to take Focaccia out of the oven and let it cool. Remember to remove it from baking pan and place it on cooking rack. Please be patient and let it cool for at least 20 minutes before you attack it. I served mine with hot bowl of Tomato soup.

Poolish Focaccia


Notes:
This one was ridiculously huge loaf of Focaccia for just 2 people. So I cut them into desired shapes and stored them in a zip lock bag and popped them in my freezer. When required, I just defrost them for few minutes and then heat them in oven. Voila, they taste as good as they tasted for the first time!
As Lolo suggests, next time I am planning to bake Focaccia with different toppings. For example, some olives, red onions, fresh herbs and may be some garlic too. Or how about some sweet Focaccia? Topped with apples or grapes tossed in little sugar and sprinkled with some aromatic spices like cinnamon or nutmeg? Yum, yum… and yeah, depending on your choice of toppings make sure that you add them just before 5 minutes you take it out from the oven. Thanks, Lolo for helping me get over with the phobia of baking my own bread with this delicious recipe.