30 September, 2007

Patrode - 3 Ways...

Photo Sharing and Video Hosting at Photobucket
Patrode

Life has been busy for last couple of weeks. Hectic work schedule with my project going in full swing I hardly got time to post new recipes or to blog-hop. My project is coming along well, though I still have quite a few bugs to iron out. Its funny how time goes by and you don’t realise it. Was it just 2 years ago I was a carefree student? Yeah, I am going through a phase of college nostalgia and I am longing for those days when I could roll out of the bed any time of the day and into class or just hang out with my friends any day of the week, at any time in a day. When ever I put on my business suit every weekday morning, I find myself looking longingly at the flannel pajama and remember the days where I would sleep in until noon. Simple pleasures of life…

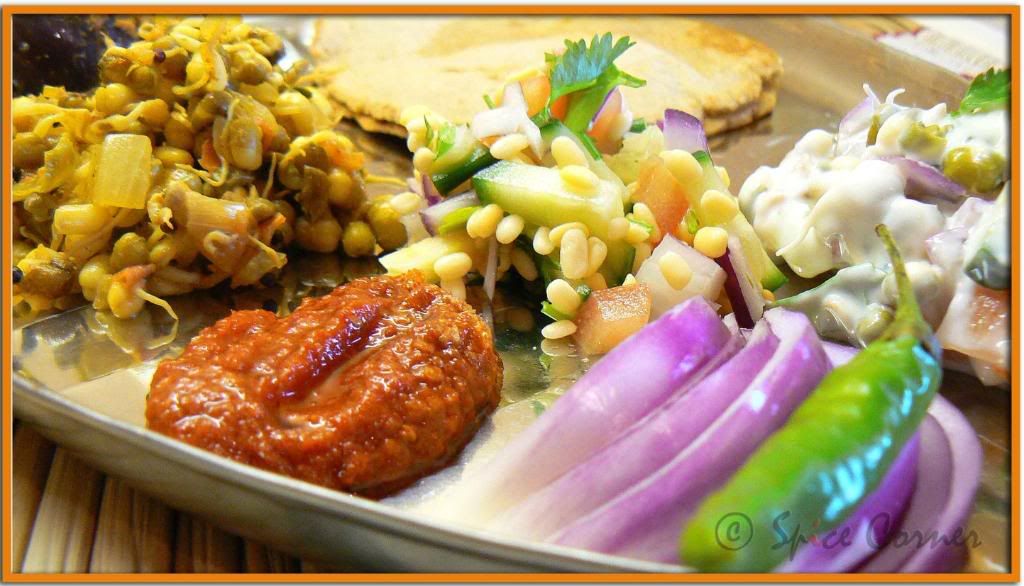
After busy weekdays at office, weekends have become luxury. After late night movies, parties and snacking most of the times we end up having brunch or lunch. At times on weekends there are moments where we don’t want to spend lots of time sweating in kitchen with elaborate meal menu and at the same time, not compromise on eating something special. By well planning and with little touch of creativity (and sometimes craziness) my hubby dear and I spend less than fifteen to twenty minutes in kitchen preparing food. For days like these dosa, idli batter come very handy which could be prepared well in advance and stored in fridge for days together.

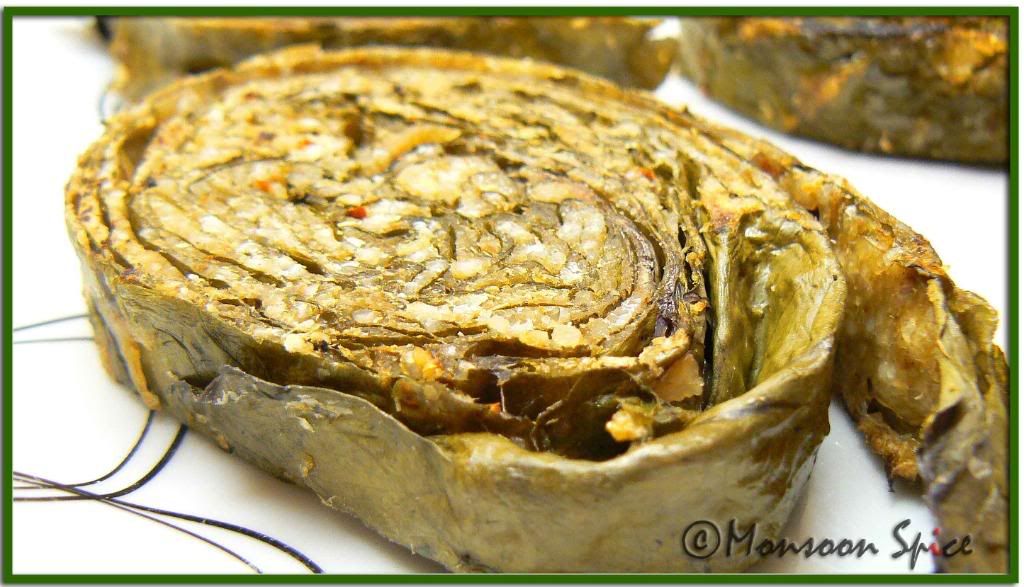
One such dish which comes in handy is Patrode or Patra. Patrode is a much loved dish from Mangalore which is actually a steam cooked colocasia/collard greens leaves stuffed with spicy mixture of rice and dals and rolled in banana leaves. The earthy aroma imparted from banana leaves gives a very distinct flavour to this beautiful dish. You will not find any homes in Mangalore who have not tasted these spicy stuffed greens. Like any other Mangalorean, Patrode is my favourite and it was a pure torture to see them in food blogs while I was unable to get hold of any colacasia or collard greens. After almost one and half years of my not so successful hunt, I had almost given up my hope for finding these greens with great disappointment. Just when I was about to give up my hope God at last got time to listen to my silent prayer and there it was, lovely bundle of colacasia leaves tightly wrapped in a cling-film in a corner shelf of an Indian store. Before anyone could lay their hands on them I greedily grabbed three bundles and moved away trying to hide big grin and twinkle in my eyes as if I have conquered the world. As soon as we reached home all I could think of doing is eating Patrode. After a quick call to my Amma to confirm the ingredients I was all set to make my own Patrode for the very first time. Yes, at last the time has come where I too can show off Patrode in my blog;) I made big batch of Patrode and stored them in freezer wrapped tightly with cling film and zip-lock. Now I have enough Patrode in my freezer which will last for at least few weeks. All I have to do when I need them is defrost them and eat… Ah… Simple pleasures of life…

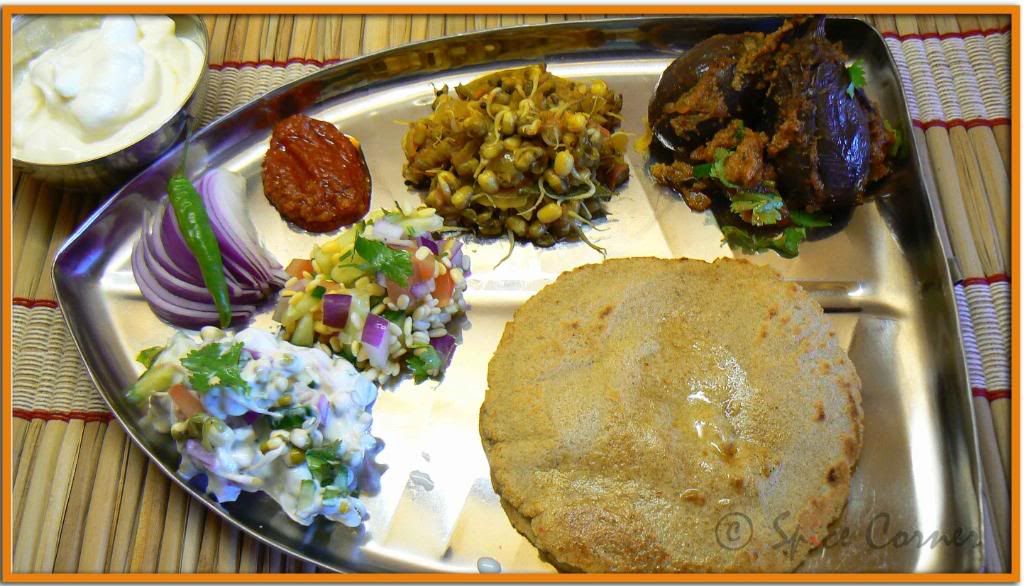
Back at home my Amma serves Patrode four ways. First way is to just serve sliced Patrode with coconut oil and a big piece of jaggery. Second way is to tawa fry sliced Patrode pieces with little oil. In third method, small chunks of Patrode is stir fried with seasonings and jaggery while in fourth method pieces of Patrode is cooked in Jeera-Coconut gravy. Usually Amma used to cook Patrode Uppukari and Patrode in Bendhi with left-over patrode. I will be giving detailed cooking instructions for all these methods today… Here we go…

Photobucket Print This Recipe
Patrode
Prep Time: 30 mins (Excluding Soaking Time)
Cooking Time: 20-30 mins
Serves: 3-4

Ingredients:
12-14 Colacasia/Taro/Collard Greens Leaves
1 cup Rice
½ cup Fresh/Frozen Coconut
½ cup Urad Dal
¼ cup Split Moong Dal
1½ tbsp Coriander Seeds
½ tbsp Jeera/Cumin Seeds
1 small Lime sized Tamarind Pulp
1 tbsp Jaggery
12-15 Red Chillies (Adjust according to taste)
Salt to taste
Photo Sharing and Video Hosting at Photobucket
Patrode

Method:
Soak rice, urad dal and moong dal in water for atleast 4 hours and rinse.
First grind coconut, coriander seeds, jeera, jaggary, tamarind pulp, red chillies to smooth paste and keep aside.
Next grind rice, urad dal and moong dal with water to coarse paste. The consistency and texture of the batter should be as that of idli batter.
Mix in both the paste and keep it aside.
Wash colacasia or collard green and pat them dry with kitchen towel.
Remove the thick veins of the green with small sharp knife or peeler. Lightly crush these veins with pestle so that rolling becomes easy. If the leaves are quite tender then no need to remove the veins.
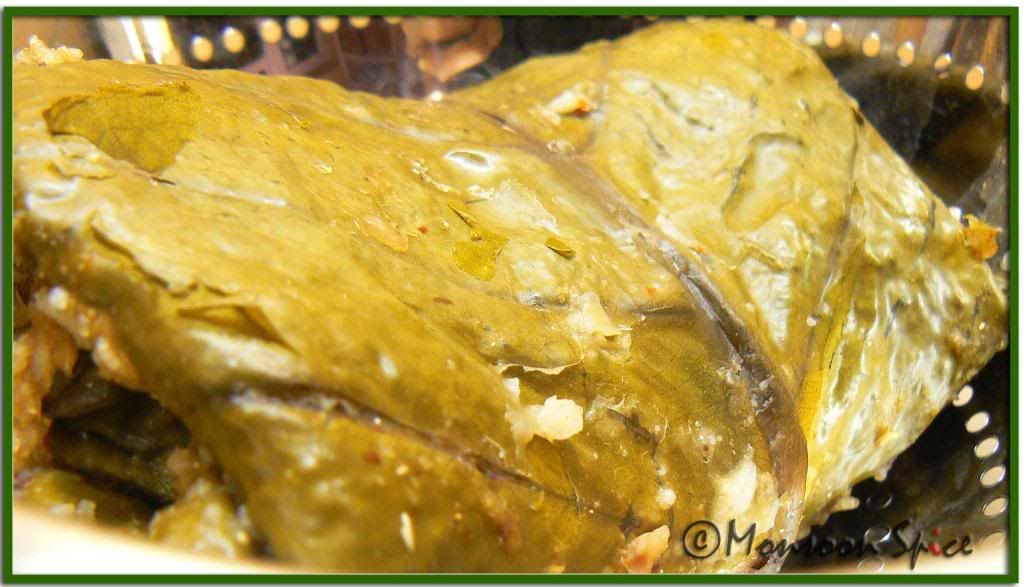
Now pick the largest leaf and place it upside down, meaning the side where you have removed the veins is facing you. Apply thin coat of ground masala all over the leaf and place another leaf on top of it. Repeat the same procedure by placing 7-8 layers of leaves.
First fold both the edges along the length and then start rolling, tucking the sides in between till you reach the end of leaf. When rolled, it will look like swiss-rolls.
Place these rolls in a steamer and cook for 20-30 minutes on a medium flame. Once cooked, leave it in steamer for at least 15 minutes before serving them.
Once it is slightly cooled down, take a sharp knife and slice them into ½ inch slices.
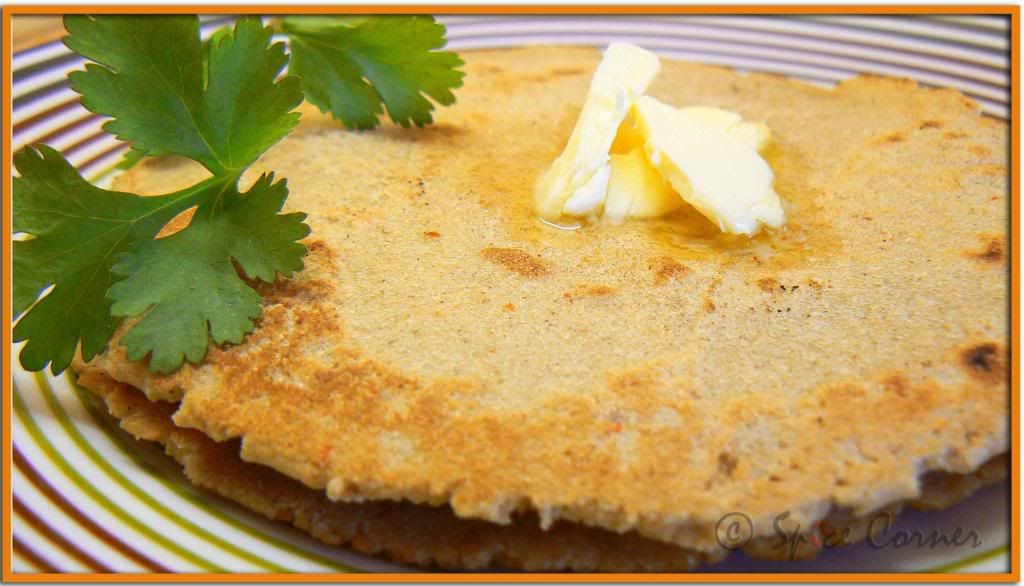
Serve them with a tsp of coconut oil poured on top and a piece of Jaggery.
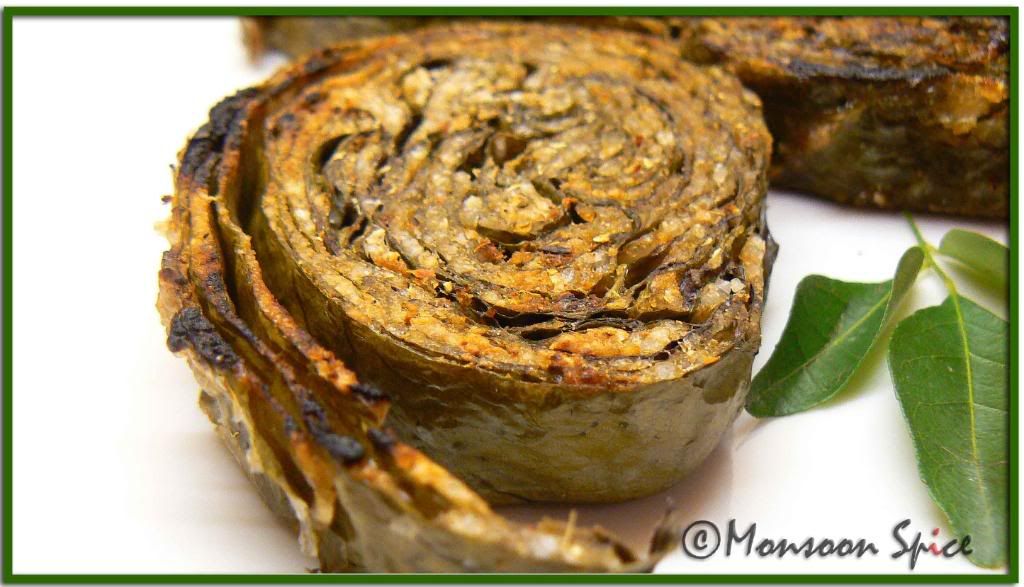
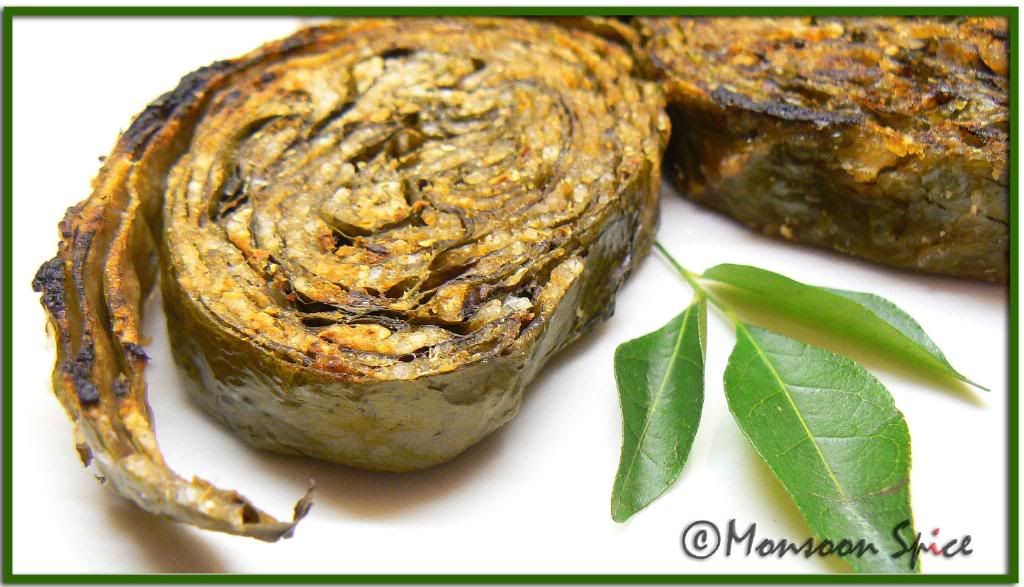
Photo Sharing and Video Hosting at Photobucket
Tawa Fried Patrode


Tips:
Undercooked colacasia leaves can cause itchiness and irritation. So make sure that you cook them well.the itchiness is caused by the needle like calcium oxalate crystals present in the leaves. These crystals tend to be extremely irritating to the throat and mouth lining, causing burning and stinging sensation. (Source: www.ntbg.org)
Adding urad dal and moong dal reduces the heat produced by chillies and colacasia leaves.
Tamarind is added to reduce the itchiness of colacasia leaves. So increase the amount of tamarind if the leaves are quite mature.


Tawa fried Patrode
Prep Time: 2 mins
Cooking Time: 5 mins
Serves: Depends on Patrode slices

Ingredients:
Few slices of Patrode
Oil (preferably Coconut oil)
Photo Sharing and Video Hosting at Photobucket
Tawa Fried Patrode

Method:
Heat tawa/griddle and spread a tbsp of oil on it.
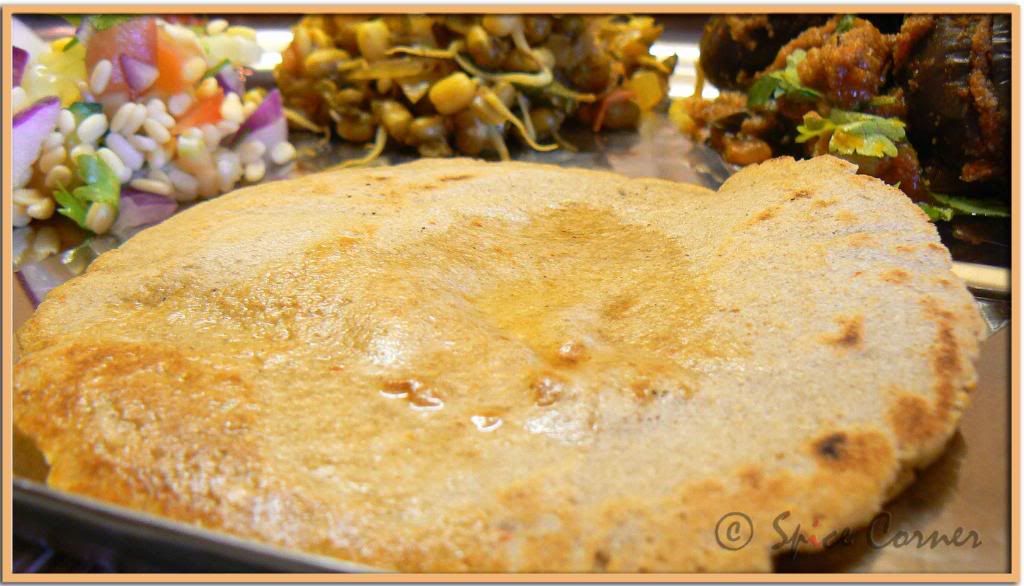
Place Patrode slices on tawa and fry till the sides turn crisp and golden brown.
Serve hot with Jagger or Coconut Chutney or Tender Mango Pickle or eat as it is.

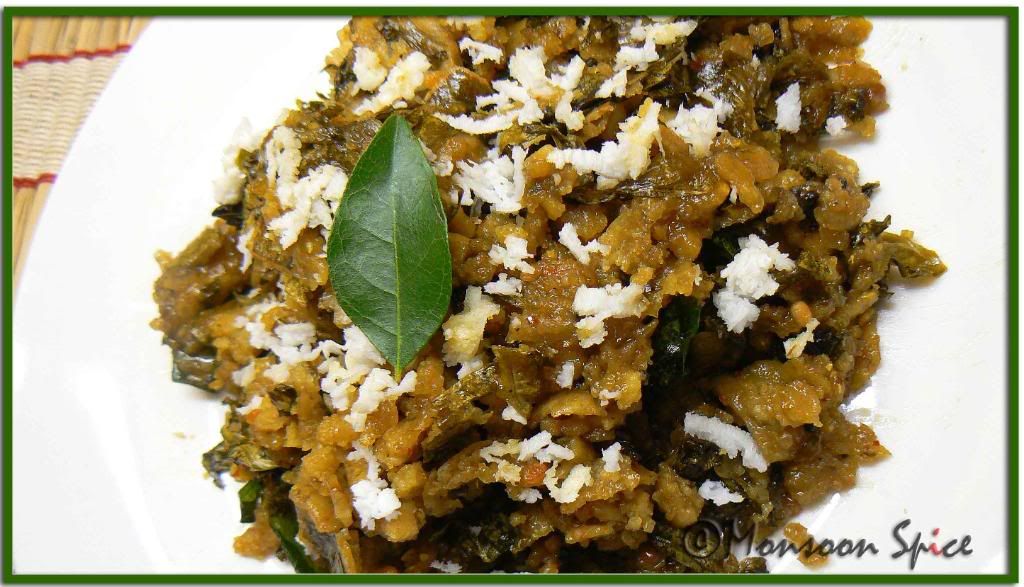
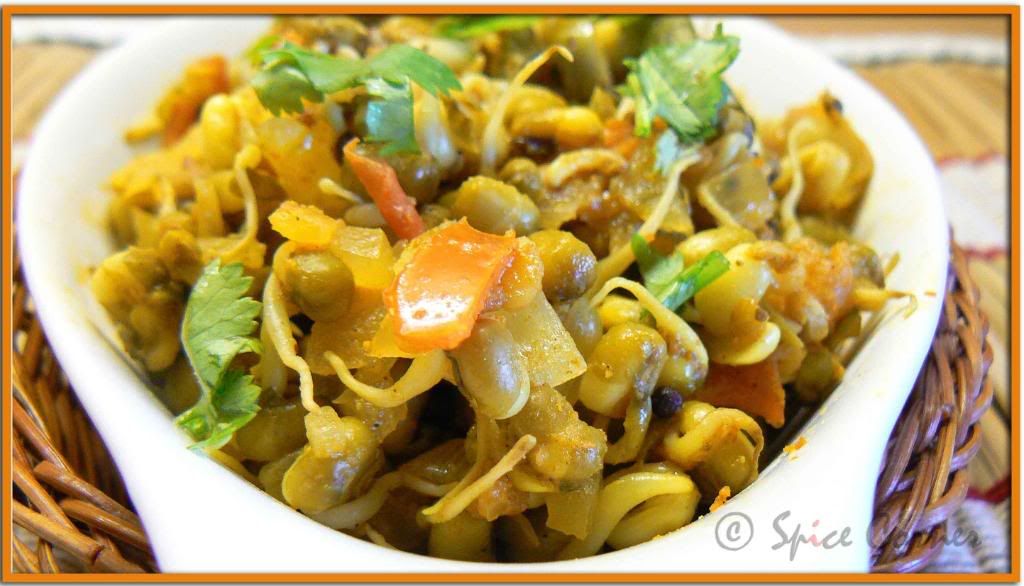
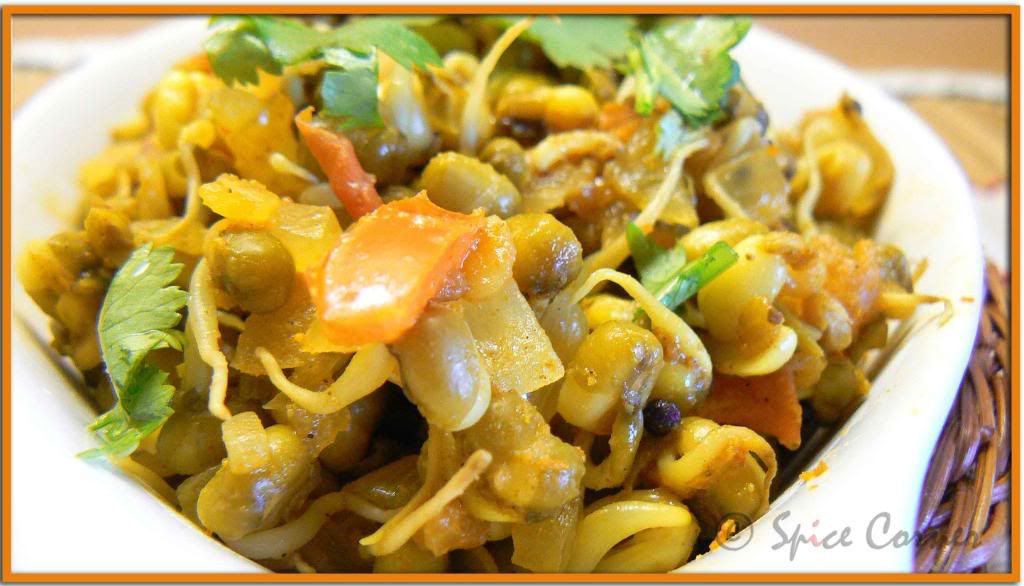
Patrode Uppukari is usually made with left-over patrode. This is what we usually cook for weekend brunch when we don’t want to spend more time in front of gas yet crave for something special and home made. It hardly takes more than 10 minutes to cook from frozen Patrode.


Patrode Uppkari
Prep Time: 5 mins
Cooking Time: 5-8 mins
Serves: 2-3

Ingredients:
3 cups Patrode pieces, chopped into 1 cm cubes
2 tbsp Jaggery
1 tsp Mustard Seeds
2 tsp Urad Dal
2 Dry Red Chillies
Few Curry Leaves
A pinch of Hing/Asafoetida
2 tbsp Fresh/Frozen Coconut gratings
2 tbsp Oil (preferably Coconut Oil)
Photo Sharing and Video Hosting at Photobucket
Patrode Uppkari

Method:
Heat oil in a pan and add urad dal, dry chillies, mustard seeds, hing and curry leaves.
When mustard starts to pop and sputter, add chopped Patrode pieces and Jaggary.
Keep mixing the mixture till the pieces are just heated.
Switch off the gas and mix in grated coconut and mix well and serve hot.

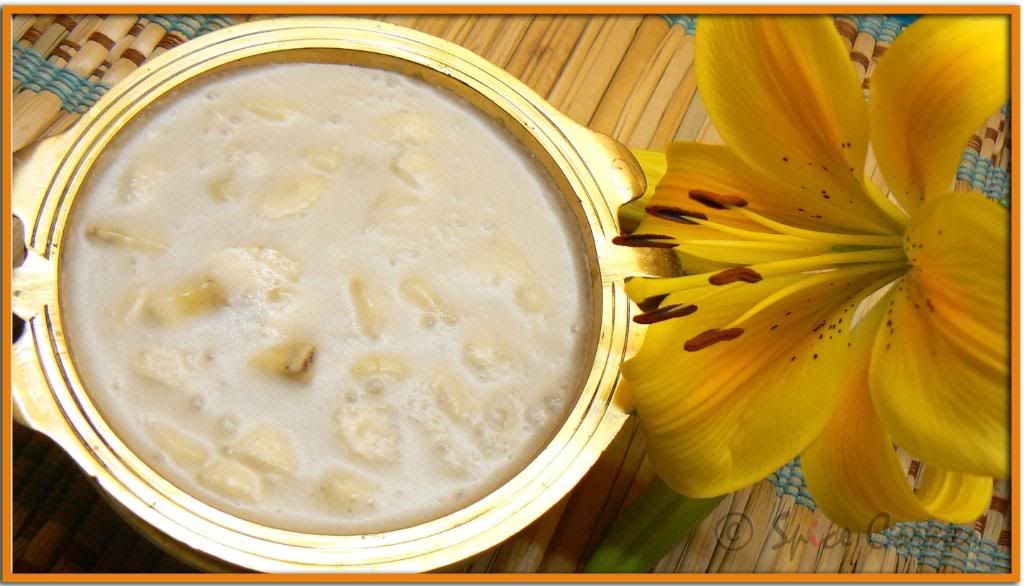
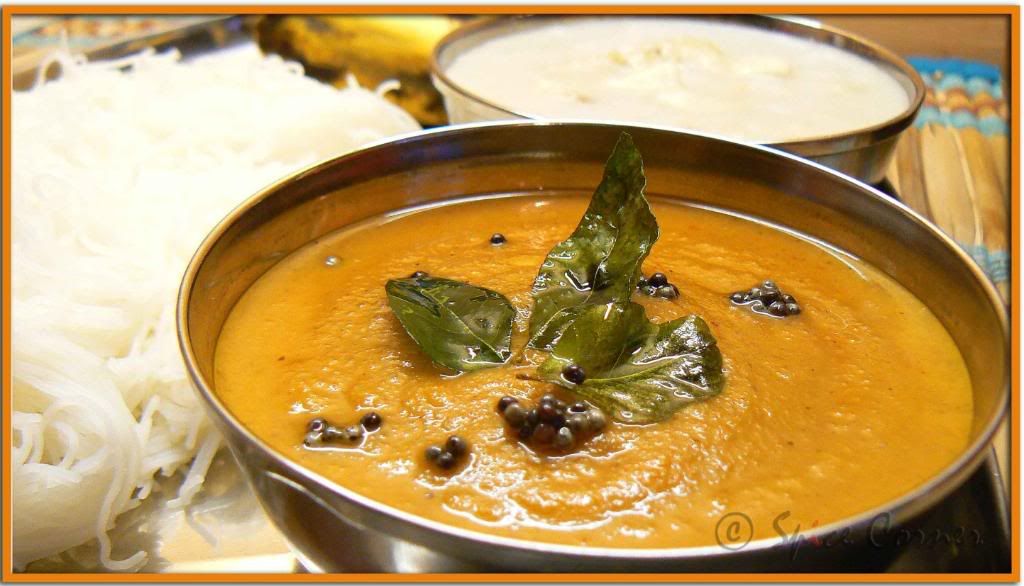
Patrode in Jeera-Coconut Bendhi is another delicacy from my Ajji’s kitchen. The spicy Patrode is cooked in sweet coconut chutney/bendhi is a marriage made in heaven.


Patrode in Jeera-Coconut Bendhi
Prep Time: 10 mins
Cooking Time: 5-8 mins
Serves: 2-3

Ingredients:
3 cups Patrode pieces, chopped into 1 cm cubes
1 tbsp Jaggery
1 cup Fresh/Frozen Coconut
1 tsp Jeera
1 tsp Mustard Seeds
2 tsp Urad Dal
2 Dry Red Chillies
Few Curry Leaves
A pinch of Hing/Asafoetida
2 tbsp Oil (preferably Coconut Oil)
Photo Sharing and Video Hosting at Photobucket
Patrode in Jeera-Coconut Bendhi

Method:
Grind coconut and jeera with little oil to smooth paste of chutney consistency.
Heat oil in a pan and add urad dal, dry chillies, mustard seeds, hing and curry leaves.
When mustard starts to pop and sputter, add ground coconut-jeera and jaggery and bring it to gentle boil for about 5 minutes.
Now add Patrode pieces and mix well coating all the pieces with Coconut-Jeera Bendhi and stir fry it for 2-3 minutes and serve hot.

24 September, 2007

Saying Good Bye to Spice Corner!!!

Hello Friends,

Today is the First Birthday of Spice Corner. Yes, one glorious year of cooking, clicking and blogging. One fabulous year of friendship, fun and feast. On this day, I sincerely thank my husband, my family and friends, all the readers of Spice Corner and you, my blog buddies for all the support, inspiration and glorious food.
Today on its first birthday, Spice Corner has got special gift from my dear one. Spice Corner is moving to its own domain www.MonsoonSpice.com and renamed as Monsoon Spice. So it’s goodbye to Spice Corner and Hello to Monsoon Spice… Please join me in the new home Monsoon Spice and update your bookmarks and blogrolls and continue to support my site as you always have. See you at the all new, Monsoon Spice

Hugs
Sia

18 September, 2007

Jolada Rotti Oota

Photo Sharing and Video Hosting at Photobucket
Dharwad Thali: (R-L) Jolada Rotti, Badane Ennegayi, Moong Sprouts Usli, Chilli-Garlic Chutney, Kosambari, Pachdi and bowl of homemade Yogurt

Title: Love at first bite!!!
Time: Sometime in early 2000
Location: Dharwad

A young girl, who was away from her home, family and all her childhood friends for the first time, was lying on her bed feeling miserable and homesick. It was more than 2 weeks since she had home cooked meals and was forced to eat bullet proof Chapattis with yellow water which was called as Dal (lentil curry) which made her crave more for Mom’s cooking. Just when she was on a verge of packing her bag and leaving her hostel for good, she heard a loud bang on door… Dud, dud…

Quickly wiping her tears away she opened the door and saw a girl who had ragged her just few days back. Yes, it was her senior, every fresher's nightmare, the one who made her measure the room with match stick, the same aweful senior who made her write a love letter to hostel watchman.

‘Oh God!!! What now??? Is she going to ask me to propose to watchman now???’
To her surprise, her senior smiled at her instead of staring with that big frown and the girl was confused if it was a good thing or bad. Senior asked her to get ready in few minutes and come with two other roommates to Senior’s room. All three fresher students were sure of the fact that it’s gonna be one of those ragging sessions and were emotinally prepared for it. But to their utter surprise six other seniors took them to one small restaurants tucked near National highway. The same seniors who had ragged them were paying for their dinner. Yes, for the first time Freshers realized that seniors can be Humans too… That was the first time when the girl felt she belonged to hostel, college and that was the first time when she felt she belonged to Dharwad, a home away from home for 4 years of her life…

You don’t get any price for guessing who that girl was ;) That was the first day I experienced the true taste of Dharwad cuisine and it was a love at first bite for me. The memory of that day is fresh and vivid till date. The restaurant was an open space and had around ten different small huts. Big cart wheels and trees separated one hut from another and gave it a sense of privacy. A large stone table was surrounded by bamboo stools and lanterns were lit to give it a rural home look. The waiters dressed in ethnic Dharwad attire wearing Dhoti and Peta, came with a fresh banana leaves and placed in front of us. First a pinch of salt on left hand side corner of leaf and then placed a red raw onion with green chilli and sliver of lime. Then followed fiery Chilli-Garlic Chutney with mild Peanut Chutney Powder. Then the leaf was adorned with roasted spicy Papad accompanied with Spiced Buttermilk. Just when our leaves started looking like artist’s color palette the attentive waiters placed Pachdi/Raita (a yogurt based raw vegetable salad), Kosambari (another lentil-vegetable salad), Moong sprouts Usli (simple stir fried sprouts), Soppina playa (a lentil dish paired with Greens like palak, dill or methi) and a small clay pot containing thick and sweet Yogurt. Then came the highlight of meal, fluffy, thin, feather light Jolada Rotti (Jowar roti) with a dollop of freshly churned homemade butter and finger-lickingly delicious Badane Yennegai, a curry made of stuffed baby eggplants. Greedily I dipped a rotti in yennegayi and put it into my mouth and taste of brinjal with coconut with different spices made me forget about everything. It was love at first bite, fiery, warm, sensuous, sinful, rustic and unforgettable… I lost the count of number of Rotties I ate but the memory still lingers, still fresh and aromatic :)


Here is my humble Dharwad Thali which I sincerely tried to recreate for this month’s RCI-Karnataka. Thanks to Ashakka and Lakshmi for giving me opportunity to indulge in my secret love affair with Dharwad cuisine after long time.

Jolada Rotti is very popular in North Karnataka which is a not just delicious to taste but also good source of nutrients. To make this roties, hands are used instead of rolling pin and are flattened to thin circles using palm. Making Jowar roti is not a child’s play. Experience, skill and patience is required to flatten the dough without breaking the roties and to get puffed roties. Its got the rustic look and unforgettable flavor…

Photo Sharing and Video Hosting at PhotobucketPhoto Sharing and Video Hosting at Photobucket
Jolada Rotti

Jolada Rotti (Jowar Flat Bread)
Prep Time: 15 mins
Cooking Time: 20 mins
Serves: 3-4

Ingredients:
2 cups Bajri/Jowar Flour
½ tsp Red Chilli Powder
Warm Water to knead
Salt to taste
Photo Sharing and Video Hosting at Photobucket
Jolada Rotti

Method:

Prepare dough by adding red chilli powder, salt to taste and by adding warm water gradually.
Let the dough rest for 15-20 minutes and again knead the dough well.
Divide dough into equal lemon sized balls.
Place the dough on flat surface dusted with generous amount of flour and using your palm spread the dough into flat, thin circle.
Carefully transfer this flat roti on hot iron griddle and roast this roti on medium heat. Gently press a wet cloth on the cooked surface of roti and turn it on other side.
Do the same with other side of the roti and cook until you see brown patches on the surface and the roti stats to puff well from centre.
Serve the roti with any side dish of your choice with a dollop of freshly churned home made butter on top.

Photo Sharing and Video Hosting at Photobucket
Jolada Rotti


Tips:
As Jowar is glutton-free flour, practice and patience is needed to make unbroken, thin rotties. When making this for the first time, don’t press the roti into large circles as it will easily break while transferring into tawa. So make small palm sized rotties which are easy to transfer without breaking them.
Another simple technique which can be used while making jowar rotti is to press the ball keeping it in between parchment or greased plastic sheet and press it using flat surfaced vessel or plate. This way you can not only make thin rotties but also it can be easily transferred onto tawa.
Click here to check another variation of Jolada rotti from Spice Corner Archives where I have used Beetroots to give it extra flavour.

Badane Ennegayi is a popular dish in Karnataka and is a great accompaniment with Akki Rotti or Jolada Rotti. Desiccated coconut is ground with aromatic spices and stuffed in between baby brinjals and the tender eggplant when cooked defines new meaning to taste.

Photo Sharing and Video Hosting at Photobucket
Badane Ennegayi


Badane Ennegayi (Stuffed Brinjal/Eggplants)
Prep Time: 15-20 mins
Cooking Time: 15-20 mins
Serves: 3-4

Ingredients:
7-8 small Eggplants
1 tsp Jeera/Cumin Seeds
Few strings of Curry Leaves
2-3 tbsp Oil
¼ tsp Hing/Asafoetida

Masala for Stuffing:
1 large Onion, chopped very finely
1-2 tbsp Coriander Leaves, chopped finely
Grind to Paste:
½ cup Desiccated Coconut
2-3 tbsp Roasted Peanuts
1 tsp Coriander Seeds
½ tsp Cumin/Jeera Seeds
1 large marble sized Tamarind, soaked in warm water and juice extracted
¼ tsp Turmeric Powder
½ tsp Red Chilli Powder
1 tbsp Sambar Powder
1 tsp Kitchen King Masala (optional)
Salt to taste
Photo Sharing and Video Hosting at Photobucket
Badane Ennegayi

Method:
Grind coconut, coriander seeds, jeera, tamarind juice, peanuts, turmeric powder, red chilli powder, sambar powder, kitchen king masala and salt to taste to smooth thick paste (chutney consistency) by adding little water at time.
Mix this ground paste with finely chopped onion and coriander leaves and keep aside.
Make plus marked slits on baby eggplants keeping their stems.
Take about 1-1½ tbsp of masala and stuff it in slit baby eggplants.
Heat oil in heavy bottomed pan and add jeera, curry leaves and hing.
When jeera starts to pop and sputter place stuffed eggplants and arrange them in a pan.
Add remaining masala to the pan and reduce the heat to low. Add about 2-3 tbsp of water if needed.
Cover and cook the eggplants on low flame stirring in between so that masala don’t stick to the pan. Cook it for 15-20 minutes till eggplants are evenly cooked.
Serve hot with Jolada Rotti or Akki Rotti garnished with chopped coriander leaves and enjoy.

Usli, usually made using different sprouts available is high source of protein and can also be served as an evening snack. Tender moong sprouts and cooked with crunchy onion and tangy tomato and flavoured by freshly ground spices.

Photo Sharing and Video Hosting at Photobucket
Moong Sprouts Usli

Moong Sprouts Usli (Moong Sprouts Stir-fry)
Prep Time: 10 mins
Cooking Time: 10-15 mins
Serves: 3-4

Ingredients:
3 cups Moong Sprouts
1 small Onion, finely chopped
1 Tomato, finely chopped
2 Green Chillies, slit
½ tsp Ginger, finely chopped
½ tsp Turmeric Powder
½ tsp Coriander Powder
½ tsp Jeera Powder
½ tsp Red Chilli Powder
2 tbsp Lemon Juice
1 tsp Urad Dal
1 tsp Mustard Seeds
1 tsp Jeera/Cumin Seeds
¼ tsp Hing/Asafoetida
Few Curry Leaves
1 tbsp Oil
1-2 tbsp Coriander Leaves, finely chopped
Salt to taste
Photo Sharing and Video Hosting at Photobucket
Moong Sprouts Usli

Method:
Heat oil in a heavy bottomed pan and to this add urad dal, mustard seeds, jeera, hing and curry leaves.
When mustard seeds starts to pop and sputter, add finely chopped onion, ginger and slit green chillies.
Sauté it till onion turns translucent and add chopped tomato.
Sauté it for around 1 minute and then add turmeric powder, coriander powder, jeera powder, red chilli powder and stir in.
Now add moong sprouts, ¼ cup water and salt to taste. Cover and cook for 10 minutes till the sprouts are cooked but retain their shape.
Remove from heat and mix lemon juice and chopped coriander laves and serve hot with rice or roties.

Kosambari is popular south Indian dish usally prepared as Neivedyam during festivals(with no onion). It’s a light and healthy salad.

Photo Sharing and Video Hosting at Photobucket
Kosambari


Kosambari
Prep Time: 10 mins (Excluding soaking time)
Cooking Time: -
Serves: 3-4

Ingredients:
¼ cup Split Moong Dal
1 small Carrot, peeled and grated
½ Red Onion, finely chopped
1 Tomato, finely chopped
¼ Cucumber, finely chopped
1 tbsp Lemon Juice
1 tbsp Coriander Leaves, finely chopped
Salt to taste
Method:
Soak split moong dal in water for about 1-2 hours and drain.
Mix all the ingredients and serve garnished with chopped coriander leaves.

Every south Indian meals end with a serving of Curd/Yogurt. Raita is made using yogurt, different vegetables, usually raw vegetables, and is seasoned with tempering of mustard and curry leaves.

Photo Sharing and Video Hosting at Photobucket
Sprouted Moong Pachdi/Raita


Sprouted Moong Pachdi/Raita
Prep Time: 5 mins
Cooking Time: -
Serves: 3-4

Ingredients:
½ cup Moong Sprouts
½ Red Onion, finely chopped
1 small Tomato, finely chopped
2 cups Yogurt
1 tbsp Coriander Leaves, finely chopped
Salt to taste
Method:
Beat the yogurt removing all lumps and add all the ingredients and mix well.
Chill before serving with Roti and rice.

Chilli-garlic chutney is a speciality of Dharwad meals which uses the chiili called Byadgi Chilli. It gives a fiery red colour to any dish when used. Check here for more details on Byadgi chillies.

Photo Sharing and Video Hosting at Photobucket
Chilli-Garlic Chutney


Chilli-Garlic Chutney
Prep Time: 10-15 mins
Cooking Time: -
Serves: 3-4
Ingredients:
4-5 Dry Red Chillies, preferably Byadgi
2-3 large Garlic flakes
1 tsp Rock Salt
1 tsp Oil
Method:
Soak dry red chillies in warm water for 10 minutes and drain.
Using mortar and pestle crush all the ingredients into smooth paste and serve with Jolada Rotti and curd rice.

Photo Sharing and Video Hosting at Photobucket
Jolada Rotti Oota


Update:
A good blog buddy of mine Meena of Memories from Mom's Kitchen is running the Portland Marathon this year to raise funds for AID (Association of India’s Development) which is a non-profit organisation in India.


As Meena says,

"AID has been working to eliminate grass root problems in India for many years now. We have seen that the effort brings about remarkable changes in people’s life and gives them hope for a better future. To continue the good work, we need support from every one of you. It would mean a lot to me if you can please visit my Marathon Fundraising Page and show your support. Every small contribution from your side is going to bring about a major change to someone's life. I hope to get all the support I need to raise this money from my fellow bloggers, friends and family. The actual marathon date is on Oct. 7th. You can also find weekly updates about my run on the fundraising page.
"

Please do visit her Marathon Fundraising Page and show your support for this noble cause. Spread the word around by posting about “Run for India… Every mile for a smile” in your blog… Run Meena, we are all with you…

05 September, 2007

Akki Shavige with Rasayana & Menthe Chutney

Photo Sharing and Video Hosting at Photobucket
Akki Shavige with Rasayana & Menthe Chutney

She was sleeping soundly, smiling in her sleep while she dreamt of chasing colourful butterflies in garden. When the persistent sun shone brightly on her face, little girl with pigtails sighed and snuggled back under the covers, blissfully embracing slumber. The mild caress of heavenly aroma coming from kitchen nudged her gently to open her heavy eyelids. Dragging her feet on cool marble floor with her favourite doll tucked under one arm and blinking her eyes to the golden glow of sunshine streaming from high ventilator and windows, she blissfully inhaled the wonderful aroma of ground coffee beans and spices. The sight of her mother with long hair tied in a loose knot adorned with pearls of water, standing in kitchen stirred the feeling of love and happiness. She ran and hugged her mother inhaling the heady perfume of her herbal soap and shampoo. Mother gently lifted her daughter planting kisses on her daughter’s blushed chubby cheeks and placed her away from heat, close to window where she could see the world waking up to the glorious sunshine. As her mother churned delicious food in lightening speed, little girl watched her dad entering the kitchen with special device to make one of her favourite food. As her dad and mom smiled at each other knowingly, little girl sat on the floor cross legged with a twinkle in her eyes as she watched her dad rotate the noodles presser which turned the steaming rice dough into thin, stringy white noodles. She smiled brightly at her parents looking over the food, simple home food, food that made her happy and content.


Yes, I am talking about my favourite breakfast item, Rice Semige/Shavige. Also known as Sevai or Santhakai in Tamil and Idiappam or Noolappam in Malayalam, Shavige is made from rice and coconut in my native Mangalore and it is usually served with sweetened coconut milk and spicy chutney or sambar. This was the only time when my mother would allow my dad to help her in kitchen as it required an extra pair of helping hand to make these stringy rice noodles. While my mom inserted the steaming balls of rice dough in the Sevai container and rotated the plate kept under the container collecting Shavige, dad would quickly rotate the sturdy handle in clock-wise direction. This Shavige Presser although might look like something out of medieval torture device to some people is a must device in every house-hold in Mangalore. Back in my Ajji’s house she had wooden Shavige Presser which looks quite different to what we have now. Instead of rotating the handle, the wooden one would press down the dough like hand water pumps in rural India. Unlike my Ajji and Amma, I use simple Chakkli Presser to make Shavige. Chakkli presser works fine for two growling tummies and moreover it’s quite easy to clean. But I must add that rotating Shavige Presser is equlivalent to working out those muscles in gym, so will not get enough of arm exercise when using Chakkli press ;)


Akki Shavige with Menthe/Methi Chutney and Baale Hannu Rasayana is my contribution to this month’s RCI-Karnataka hosted by our blog queen Asha of Foodie’s Hope and also to this month’s JFI-Banana hosted by lovely Mandira of Ahaar.


Akki Shavige (Rice Noodles)
Prep Time: 30 mins (excluding soaking time)
Cooking Time: 20 mins
Serves: 2-3

Ingredients:
1 cup Rice
1 cup Fresh/Frozen Coconut
2 tbsp Oil, preferably Coconut Oil
Salt to taste
Photo Sharing and Video Hosting at Photobucket
Akki Shavige

Method:
Wash and soak rice in 2 cups of water for 4-5 hours or overnight.
Drain and grind this rice with grated coconut and salt to taste adding little water at a time to very smooth paste. Note that there shouldn’t be any lumps and the paste should be silky smooth. Usually my Ajji and Amma make very thin batter of buttermilk consistency but I grind it to Dosa batter consistency which works fine for me.
Apply coconut oil to heavy bottomed kadai/wok covering it well. Pour the batter in this wok and keep mixing this batter in medium flame till all the water evaporates and it turns to a thick lump of dough.
Switch off the gas and start making big lemon sized balls by applying little cold water to stop it from sticking to your hand.
Steam cook these rice balls in a steamer or pressure cooker without putting its weight for about 10 minutes.
Place two steaming rice balls in Shavige presser or Chakkli maker and press the noodles. Place these noodles in a banana leaf or wet cloth and let it cool. This noodle needs to be cooled down to hold their shape. Serve these noodles with Chutney, sweetened Coconut Milk or Sambar. You can also make Tamarind or Lemon Rice Noodles with the leftovers.
Check Shilpa or Aayi's Recipes and Manjula of Dalitoy's recipes for Shavige where they use Shavige Press here and here. And also check here for Viji of Vcuisine's recipe for Vella, Lemon and Ulundhu Sevai using Chakkli Press.

My Ajji and Amma usually served Akki Shavige with Sweetened Coconut Milk or Rasayana and Menthe Chutney. Rasayana (Rasa means Juice/essence/flavour/taste in Sanskrit) is basically a sweetened coconut milk mixed with chopped Bananas or Mangoes depending on seasonal availability of fruits. Freshly extracted Coconut milk is flavoured with Jaggery and pinch of Cardamom and made wholesome by adding chopped bananas or mangoes.


Rasayana (Banana in Sweetened Coconut Milk)
Prep Time: 20-25 mins
Cooking Time: -
Serves: 2-3

Ingredients:
1 cup Bananas, quartered and sliced
1½ cup freshly extracted Coconut Milk (big no-no to Canned Coconut milk)
1-2 tbsp grated Jaggery, adjust according to taste
2 Green Cardamoms, skins removed and seeds crushed
1 tsp roasted Sesame Seeds (Optional)
Small pinch of Salt


Photo Sharing and Video Hosting at Photobucket
Rasayana

Method:
Dissolve grated Jaggery in coconut milk and mix all the ingredients.
Serve cold with Akki Shavige or drink as it is.


Variation:
You can use ripe sweet mango in place of bananas.
Replace coconut milk with milk and add 2-3 tbsp of banana or mango puree to give it thick base.


Photo Sharing and Video Hosting at Photobucket
Akki Shavige with Rasayana & Menthe Chutney

Methi/Fenugreek seeds are one of the most importance spices in Mangalorean cuisine. My Ajji would soak few methi seeds in buttermilk and make us drink after heavy meals as methi is good for digestion. Read more about benefits of Methi here and here. Menthe Chutney is one dish which is full of different flavours. Bitter methi is ground with creamy coconut and spicy chilli and then cooked with dash of jaggery to give it little sweet flavour.


Menthe Chuteny (Methi Seeds Chuteny)
Prep Time: 10 mins
Cooking Time: 10-15 mins
Serves: 2-3

Ingredients:
1 tsp Methi/Fenugreek Seeds
1 cup grated Fresh/Frozen Coconut
3-4 Dry Red Chillies
1-2 tbsp Jaggery, adjust acc to taste
1 tsp Oil
1 tsp Mustard Seeds
Few Curry Leaves
Pinch of Hing/Asafoetida
Salt to taste
Photo Sharing and Video Hosting at Photobucket
Menthe Chutney

Method:
Dry roast methi and broken red chillies in a pan for around 1 minute till you get nice aroma of roasted methi.
Grind sautéed spices with coconut adding little water at a time to smooth paste.
Heat oil in a pan and add mustard, hing and curry leaves.
Once mustard starts to pop and sputter, add ground paste, jaggery, salt to taste and ½ cup of water.
Cook it on a low flame for 10-15 minutes stirring in between. Serve hot with steamed rice or akki shavige.