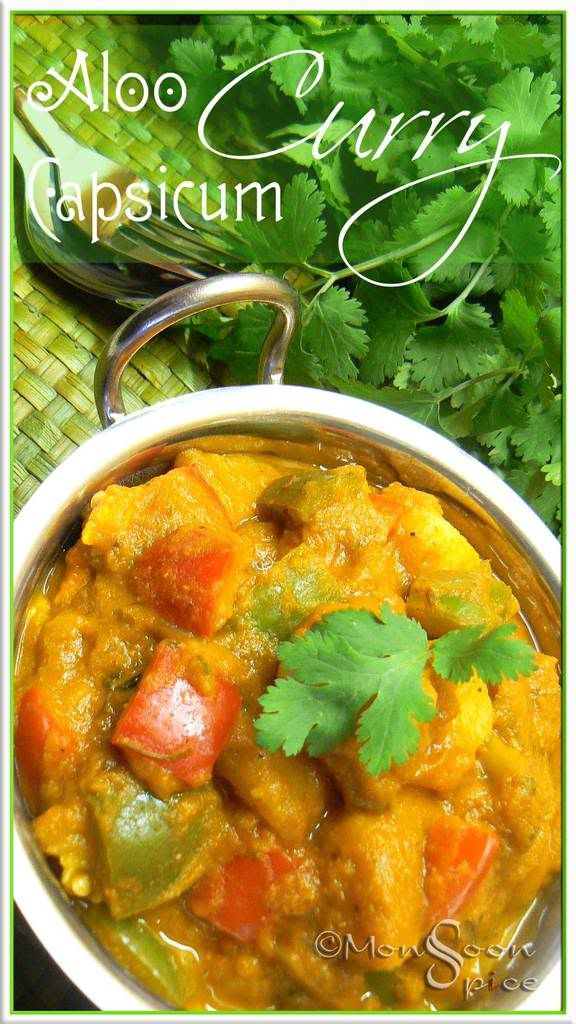
30 January, 2009

Lauki Choley: Complex or Simple?

Photobucket
Lauki Choley
Note 1: Complicated food can have very few ingredients.
Complicated recipe doesn’t mean complex flavours.

Note 2: Simple recipe can have lots of ingredients.
Simple food can have complex flavours.
Confused? Please don’t be… Both the statements are almost same and they prove once again my knack of making things complicated. I had to draw this hypothesis (?!) based on a comment that I received few days back where one of my blog reader left a note saying my recipes always have long list of ingredients and lengthy procedures but they are not as complicated as they seem to be!!! Very interesting feedback… very, very interesting indeed…

So I have decided to clarify few things and come clean ;) Looking back at the recipes I have posted I did notice that some of my recipes (OK most of my recipes, happy?) do have little lengthy list of ingredients and cooking procedure. But most the ingredients in that lengthy list are the ingredients which are used in almost everyday cooking. Well, the ingredients used in simple tadka or tempering itself has minimum of four ingredients and at maximum it can go up to seven ingredients!

At the same time I consider baking to be one hell of complicated recipe to master! (Message to all you wonderful bakers: Would you please stop laughing so loudly and it is not at all lady like to roll on the floor holding your stomach! :P) The simplest bread recipe I had come across has just six ingredients but it doesn’t mean it is easy to make! Does it? Nah… Don’t even try to convince me ;) I won’t be convinced so easily when it comes to baking.

So you see, it’s all the matter of perception as how you perceive all the recipes and also little bit of a thing called practice. If you perceive a recipe to be complicated just by looking at the things then there is a high chance of you avoiding to cook it. But at the same time in spite of that you go ahead and practice to cook that particular recipe then there is a high level of chance of you changing your opinion. Same this applies to simple food stuff…

I am one of those species who can stand on single legs and cook 3-4 varieties of Koftas, Curries and Biriyanis from scratch and still walk away by the end of it instead of crawling. And at the same time I am someone who dives at the chance of baking a bread from scratch just by looking at the TV show where the host made bread looking job something similar to building a castle on sea shore by 2 year old, then there is a high chances of ending up with a smoke alarm waking every dead soul in half a kilo meter distance! Yup, ingredients are not proportional to the complexity of dish or flavour. So it’s highly inappropriate to judge any recipe looking at the list of ingredients and the procedure to cook it. I hence rest my case!!!

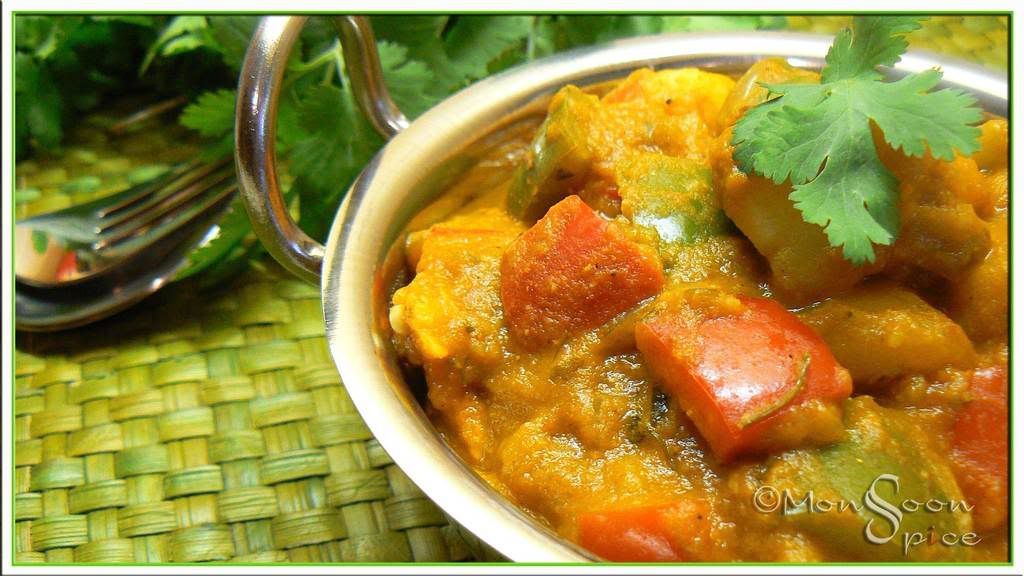
Did you get confused again? I don’t blame you… why don’t we forget all my gibberish and come back to the main part of this blog. Yes, let’s talk about food, the glorious food! Today we are having Lauki Chole on our menu. Nah… Don’t twist your nose and roll your eyes. It’s not the same Lauki Kala Channa Masala I had posted few months back. It is Lauki and ‘The’ Channa (chickpeas) I want to talk of. It is your usual Chole recipe except for the addition of bottle gourds which really gives a new dimension to this good-old Punjabi recipe. After my successful attempt at combining bottle gourd with black chickpeas, I was left without any doubt of bottle gourd and Kabuli Channa. So there was no hesitation or second thought when I cooked this curry and guess what, it was just as I thought them to be! Little sweet bottle gourds and nutty chickpeas cooked in aromatic spicy and tangy gravy of onion and tomato is something that needs to be tasted to believe. A perfect marriage made in heaven and happily ever after… and please, don’t keep worrying looking at the ingredients list. I can bet my month’s salary that it is not as complicated as it may sound! Sending this delicious bowl of Lauki Chole to dear Valli who is having a love affair with legumes with My Legume Love Affair 7th Helping, an event started by lovely Susan at Well Seasoned Cook. And Lauki Chole is also my entry for this month’s JFI-Chickpeas hosted at a lovely blog Sometimes Foodie.

Photobucket
Lauki Choley

Photobucket Print This Recipe
Lauki Choley Masala (Bottle Gourd with Chickpeas cooked in creamy Onion Tomato Gravy)
Prep Time: 10 mins
Cooking Time: 30-45 mins

Serves: 4-5
Recipe Level: Basic/Easy to Medium
Spice Level: Medium
Serving Suggestion: With any Indian flat bread or flavoured/steam cooked rice

Ingredients:
1 medium Bottle Gourd/Sorekai/Lauki/Dudhi, peeled and cut into bite sized pieces
¾ cup Chickpeas, soaked in water overnight and cooked or 1 can Chickpeas, rinsed and drained
3 large juicy Tomatoes or 1 canned Tomato, pureed
1 tsp ginger-Garlic Paste
¼-½ tbsp Channa Masala/Garam Masala
1 tsp Kitchen King Masala (Optional)
1 tsp Kashmiri Chilli Powder (Optional, adjust acc to taste)
½ tsp Turmeric Powder
¼ tsp Amchur/Dry Mango Powder or 1 tsp Lime Juice (Adjust acc to taste)
1-2 tsp Sugar/Jaggery (Optional but recommended)
1 tbsp Kasuri Methi/Dried Fenugreek Leaves (Optional but recommend)
1 tsp Jeera/Cumin Seeds
¼ tsp Hing/Asafoetida
1 tbsp Oil
Salt to taste

For Onion Paste:
1 large Onion
½ inch Cinnamon Stick
2 Cloves
2 Green Cardamoms
½ tsp Jeera/Cumin Seeds
Photobucket
Lauki Choley

Method:
Grind onion, cinnamon stick, cardamom, cloves and cumin seeds to smooth paste without adding any water and keep it aside till needed.
Heat oil in a pan and add cumin seeds and hing. When it starts to sizzle and change to light brownish colour, add ground onion paste. Keep stirring the paste till it turns light golden brown and looses its moisture. Make sure that the paste is cooked well or else you will end up with bitter tasting curry.
Add kasuri methi and ginger-garlic paste and stir well. Cook this for a minute or two till raw smell of the paste disappears. Then add tomato puree and mix well. Mix in channa masala/garam masala, kitchen king masala, turmeric and red chilli powder. Cook it for a minute or two for all the flavours to blend well.
Now add about ¾-1 cup of water, sugar and salt to taste and bring it to gentle boil. Mix in bottle gourd pieces and cover the pan. Let it cook on medium flame for about 5-8 mins.
Mix in cooked chick peas and amchur powder. Add little more water if needed and cover and cook for another 5-8 minutes till the bottle gourd is cooked through and all the flavours blend well.
Mix in finely chopped coriander leaves just before serving. Serve this delicious, creamy Lauki-Chole with any Indian flat breads or flavoured breads and enjoy.


Note:
Add one medium potato that is cooked and roughly mashed to the gravy which will not only thicken the gravy but also enhances its taste.
Replace Bottle Gourd with Ridge Gourd or Potatoes or skip the vegetables and just use chickpeas for different flavours.
Slow cooking of any lentils or legumes gives a wonder flavour and taste to any curry. But since we are using bottle gourd in this recipe, too much of cooking will result in over cooked bottle gourds and that is exactly what we want to avoid.

27 January, 2009

Vangi Baath: Curried Memories!

Photobucket
Vangi Baath

Tic toc…
Tic toc…
Tic toc…
Tic toc…

Small girl was staring at the grandfather clock ‘tic toc’ing since last half an hour. She was waiting for her father to return from work. She was hungry, sleepy but determined to wait till he returned. She couldn’t know what time it was but her mother had shown her that her father would be back when the small hand on clock points to seven and the large one to six.

Tic toc…
Tic toc…
Tic toc…
Tic toc…

Oh this old, old clock… “May be it is slow because it is getting older, just like Gampa (grand pa)”, she thought. Why, the long hand seems to be stuck at three from long time.

Tic toc…
Tic toc…
Tic toc…
Tic toc…

One, two, three, four, five, six, seven, nine, ten… she counted missing ‘eight’ and felt happy about able to count till ten that her Ajji had taught her that day. “Come my little darling and have your dinner”, said her mother smiling. ‘No Amma, I am waiting for Appa to come home. Then I will impress him tonight when he returns with this new lesson I learnt and I will ask for that doll with red saree for my birthday”, she said loudly to her mom. Mother looked at her little girl who will be celebrating her third birthday in month’s time and made mental note of buying the doll which her daughter liked.

Tic toc…
Tic toc…
Tic toc…
Tic toc…

Vroom… little girl heard her the sound of her father’s bike approaching and started to jump up and down clapping and giggling that sounded similar to the sound of her jiggling silver anklet. “Appa came… Appa came… Appa came…” she chanted and ran to her father spreading her hands like a bird flying in the sky with its wings spread out widely. As her father lifted her, she planted sloppy, wet kiss on his cheeks and giggled as he tickled her tummy.

With non-stop chatter she watched with adoration as her father as he came to pick her up after taking bath and went inside the Pooja room. There he made her sit on his lap and taught her new Ganesha Shloka and put small red tilak of Kumkum and fragrant Sandalwood on her forehead. After promising her to buy her favourite doll for her birthday, both father and daughter went to dining room. There her mother was waiting for them along with her aunts, uncles, grand parents and elder cousins. Freshly cut green plantain leaves were placed in two long rows along with small wooden planks serving as seats. As the cook started serving two types of palyas, pickle, salt, raita, and rice, little girl kept on chatting with her father telling him what new things she had learnt that day from her grand parents and cousins.

Just when she was about to start eating, she saw cook-uncle serve odd coloured rice with some black pieces in it. She hesitantly picked handful of rice along with strange looking black pieces and started to closely examine its contents. There were some lentils and mustard and also two of her favourite things, roasted cashews and peanuts. Slowly she started to pick peanuts and cashew pieces and popped them into her mouth. They were crunchy and delicious, just the way she had thought them to be. Then slowly she picked roasted lentils and put them in her mouth. Oh, they were crunchy and tasty too.

Then slowly she picked one of odd looking black thingy and took a small bite of it. Munch, munch, munch… “Mmm, not bad”… One more bite, and this time it was little bigger bite. Munch, munch, munch… “Mmm, it’s bit tasty”, she thought to herself. Next she picked small mouthful of rice and put it into her mouth. “Oh my god!!! It is so spicy yet tasty”. “Water, oh spicy… water please”, she screamed. She could feel the water coming from her eyes as well as her nose. But the worst thing was seeing her cousins laughing at her.

That was the first time she had first hand experience of eating spicy food. And that was the day I was first introduced to spicy Vangi Baath, many southern Indians favourite way of serving Eggplants. I was not even 3 yrs old when I had first tasted this Curried Eggplant Rice and the memory of it is so fresh that I feel as if it had happened just few days back. It’s really strange how the thought of certain foods can take you down the memory lane. It’s strange how our memory is connected to certain taste that we had experienced long back. And it’s really strange how we remember even minute detail of something happened decades back. Ask me something that had occurred just few days back and I can bet my full years salary and I won’t be able to recall it. But ask me something that had happened decades back and I can tell you minute of minute details without fluttering my eyes!!! Strange, indeed… Curried rice and curried memories....

Coming back to the recipe part, yes it is Vangi Baath’s turn today. Being hardcore (?!) Brinjal/Eggplant lover I was surprised to note that I haven’t had posted my all time favourite recipe of Curried Brinjal/Eggplant Rice. This most famous Southern Indian Rice was cooked at least once in every fortnight at my parent’s home. Since my Dad loved anything cooked with this King of Vegetables, it was no surprise for Daddy’s girl to fall in love with it instantly. If you have already prepared the spice powder, then it a matter of few minutes to whip up this delicious, spicy Rice. I usually prepare Vangi Bhath Masala Powder from scratch and stock it in refrigerator and use it as and when required. But if you don’t have patience to make it at home, then simply pick a packet of MTR Vangi Baath powder which is usually available in any good Indian Groceries. But let me tell you some secret, nothing can beat homemade fresh batch of Vangi Baath Powder. Served with dollop of chilled Yogurt and crisp Papads, this is one meal to enjoy any time of the day. I am sending this bowl of Vangi Baath which is my dad's favourite food to dear Alka who is hosting a lovely event called Just for You.

Photobucket
Vangi Baath

Photobucket Print This Recipe
Vangi Baath Masala/Spice Powder
Prep Time: 5 mins
Cooking Time: 5 mins
Makes: Around 1½ cups
Shelf Life: 2 months when refrigerated in an air tight container
Recipe Source: Amma
Recipe Level: Easy/Beginner
Spice Level: Medium to Hot

Ingredients:
1 cup Channa Dal
¾ cup Urad dal
¾ cup Coriander Seeds
1 tbsp Jeera/Cumin Seeds
1 tbsp Poppy Seeds
1 cup Dry Red Chillies (I used combination or regular chillies and Byadagi Chillies for Spice and Colour)
½ cup Desiccated Dry Coconut
3 inches Cinnamon Sticks
4 Cloves
½ tsp Hing/Asafoetida
1 tsp Salt
3 springs of Curry Leaves
1 tsp Oil
Method:
Dry roast channa and urad dal separately till they turn light golden brown in colour and keep them aside.
In a same skillet dry roast coriander seeds, cumin seeds, dry red chillies, hing, poppy seeds, cinnamon sticks and cloves till they turn light golden and fills the kitchen with heady aroma, about 2 mins, on medium flame. Keep them aside to cool down completely.
Now dry roast desiccated coconut till it turns light golden, about 1 min and keep it side to cool.
Heat oil in a pan and roast curry leaves till they turn crisp, about 1 min and set it aside.
Once all the lentils and spices have cooled enough grind them to fine powder. Store this Vangi Bhath Masala Powder in an air tight jar and keep it in refrigerator.

Photobucket Print This Recipe
Vangi Baath (Curried Brinjal/Eggplant Rice)
Prep Time: 10 mins
Cooking Time: 15-20 mins (60 mins if using freshly prepared rice)
Serves: 3-5
Recipe Source: Amma
Recipe Level: Easy/Beginner
Spice Level: Medium
Serving Suggestion: With any Raita/Yogurt or with Papad/Chips

Ingredients:
5-6 cups Cooked Rice/2 cups uncooked Rice (Preferably Basmati or Sona Masuri)
8-10 Baby Purple Brinjals/Eggplants, stems removed, halved and then sliced into ¾ inch wedges and placed in cold water
2 tbsp Vangi Baath Masala Powder (Use homemade or store brought, Adjust acc to taste)
1 small marble sized Tamarind Pulp, soaked in ¼ cup hot water for 10 mins and juice extracted
1 tbsp Jaggery/Brown Sugar (Optional, Adjust acc to taste)
1-2 Green Chillies, slit (Optional)
½ tsp Turmeric Powder
2-3 tbsp Roasted Peanuts or Cashews
Salt to taste

For Tadka/Tempering:
1 tsp Mustard Seeds
1 tbsp Channa Dal/Split Bengal Grams
1 tbsp Urad Dal/Split Black Lentils
2-3 Dry Red Chillies, halved (Adjust acc to taste)
2-3 springs of Curry Leaves
¼ tsp Hing/Asafoetida
2 tbsp Oil
Photobucket
Vangi Baath

Method:
Cook rice in enough water and let it cool completely. Then take this cooked rice and add tbsp of oil to it. Mix well making sure that every grain is separate. Keep it aside till needed.
Heat oil in a pan and add mustard seeds to it. When it starts to pop and splutter, add channa dal, urad dal, halved dry red chillies, hing and curry leaves. Sauté till the lentils turn golden brown.
Now add baby brinjal wedges and slit green chillies if using and stir fry continuously for 5 mins till oil and lentils are coated well.
Now add tamarind water, jaggery, vangi baath powder, turmeric powder and salt to taste and mix well. Cover and cook at medium heat for 5-8 more minutes, stirring in between.
When the brinjals are cooked well add cooked rice and roasted peanuts and mix well. Cook for 2 more minutes till every grain of rice is cooked through and the spice mixture is coated well.
Serve this delicious Vangi Baath with cool Raita and Papads and enjoy.


Notes:
Fry finely chopped onion after tadka and before adding brinjal pieces if needed.
Add potatoes, green peas and capsicum/bell peppers in place of brinjals to enjoy this delicious rice if you are not too fond of eggplants.
Replace tamarind with few tsp of lime/lemon juice.
Use Ghee in place of oil if you are not counting all those calories.

Wishing all my fellow Indians a very
Happy Republic Day.

21 January, 2009

Pineapple Rasam to Tantalise your Taste Buds...

Photobucket
Pineapple Rasam

Rasams rule our dinner menu’s in winters and for that matter, even in summers. Gently steamed bowl of rice and a ladleful of spicy and tangy Rasam with crunchy Papadams top my comfort food category. This is a type of food which can lift your mood and sooth your spirit. This is a type of food that warms your heart and takes you down the wonderful memory lane.


Talking of Rasams or Saaru as we call in Kannada, you will be amazed to find hundreds of recipes of making it with different ingredients. While Tomato Rasam is my favourite one, Lemon, Coconut, Horse gram, Kokum etc are few more varieties of Rasams I enjoy quite often. Apart from these, there is one more Rasam that my Amma used to cook for us when she was short of time and ingredients. And that one is Pineapple Rasam which my mother had learnt from her sister.

My Chikkamma’s recipe of Pineapple Rasam is very simple, uses very few ingredients and quick to make. It is one of the best examples of using fruits in savoury recipes. I make it quite often when I am feeling bit too lazy to cook lentils and chop vegetables. Few cups of fresh or canned Pineapple cubes cooked along ginger and green chillies for spiciness, tamarind pulp for tingling sourness and jaggery or palm sugar for sweet note is a tingling sensation of three flavours to your taste buds. Addition of Rasam Powder makes this simple Rasam more flavoursome and redefines the simplicity in cooking. Yes, you don’t need basketful of ingredients and cup full of spices to cook something exciting and exotic. Just handful of ingredients and pinches of spices is enough to tantalise your senses and touch your soul.

Photobucket
Pineapple and Rasam Powder for Pineapple Rasam

Photobucket Print This Recipe
Pineapple Rasam (Sweet, Sour and Spicy Pineapple Soup)
Prep Time: 10 mins
Cooking Time: 15-20 mins
Serves: 3-4
Recipe Source: Chikkamma, my Aunt
Recipe Level: Easy/Beginner
Spice Level: Low to Medium
Serving Suggestion: With steam cooked rice and papad

Ingredients:
2-3 cups Pineapple, peeled and cut into 1 inch cubes
1-2 Green Chilli, slit (Adjust acc to taste)
½ tsp Ginger, crushed and finely chopped
½ - 1 tbsp Rasam Powder, homemade or store bought (Adjust acc to taste)
¼ tsp Turmeric Powder
½ tsp Tamarind Paste or 1 small marble sized Tamarind Pulp
½-1 tbsp Jaggery or Palm Sugar (Adjust acc to taste)
5 Black Pepper Corns, crushed (Optional)
1 tbsp Coriander Leaves, finely chopped
Salt to taste

For Tadka/Tempering:
½ tbsp Ghee or Oil
1 tsp Mustard Seeds
1 tsp Jeera/Cumin Seeds
¼ tsp Hing/Asafoetida
1 Dry Red Chilli, halved
Few Curry Leaves
Photobucket
Pineapple Rasam

Method:
Take 4 cups of water in a pan and add rasam powder, jaggery and tamarind extract to it. Bring this to gentle boil over medium heat.
Now add cubed pineapple pieces along with slit green chillies, ginger, turmeric powder, crushed peppercorns and salt to taste. Simmer the heat and cook it covered for 10 mins. Remove the lid and bring this rasam to a boil and cook it for another 2-3 mins.
Mean while heat ghee/oil in a pan and add mustard seeds to it. When it starts to pop and splutter, add cumin seeds, halved red chillies, hing and curry leaves. Roast the spices till they are fragrant, for about 1 minute.
Transfer the tadka/tempering to the rasam.
Add finely chopped coriander leaves and cover the pan and let it rest for 5 more minute for all the flavours to blend well. Serve hot with steam cooked white rice and Papadams and enjoy.


Notes:
  • Sometimes I add a cup of cooked dal water while making this Rasam.
  • Puree a cupful of Pineapple cubes and add this juice while making the Rasam to get distinct pineapple flavour in gravy.
  • Use Sambar Powder if you are out of Rasam Powder or skip using the Rasam Powder and add chilli powder, coriander powder and jeera powder in it's place.

On other note, my office work has kept me away from replying to your comments, mails and blog-hopping. Hopefully I should be able to post recipes and blog-hop regularly from next month. So friends, please bear with me for a while.
And do hop to dear Sailu's blog for my article on Exploring Udupi-Mangalorean Street Foods, part of her wonderful series of Indian Food Trail.

17 January, 2009

Thai Yellow Curry: Sunshine in Bowl to Lift Your Spirit...

Photobucket
Thai Yellow Curry
“How do they taste? They taste like more.”
-H.L. Mencken
And that’s exactly how I feel when ever I am served real good Thai food. I like everything about Thai cuisine; the ingredients used, its flavour, the way it’s cooked, the fresh herbs and aromatic spices and above all the way it tastes. And another reason for my love affair with Thai food is the use of coconut in most of the recipes. A typical Mangalorean girl that I am, my heart skips a beat and makes me do cartwheels in air whenever I find this favourite ingredient of mine in any recipe.

Since the day we have had come back from our India trip, we haven’t been cooking anything elaborate in our tiny kitchen. Although we would like to blame our mothers for spoiling us by not letting us cook in their kitchen, it was plain laziness that has kept us away from pots and pans. All these days we have been satisfying ourselves with soups and breads and simple dal/rasam and rice. But it didn’t take much longer for stomachs to start grumbling for something exotic and our taste buds to crave for something packed with flavours.

It’s not easy to tackle the situation when you are faced with laziness and desire to eat something delicious. And to add to our misery we stumbled upon some really delicious looking Thai Curries on one of the cookery shows. Did we have any choice left? Na…da… So it was decided on simple Thai menu for the day and of course for the blog also ;)

With typical cold and grey winter days and sun god gone missing for days together we were left with no choice but to create this sunshine in a bowl to lift our mood and spirit. We chose to cook this delicious bowl of Thai Yellow Curry and served it with fragrant Thai Jasmine Rice which resembled the snow flakes that had turned our neck of woods into snow kingdom. The colourful and delightful vegetables cooked in creamy and sweet coconut milk and flavoursome curry paste made using freshest of herbs and spices is sure to bowled any foodie’s heart and soul. Thai Yellow Curry is my entry for AWED-Thai event hosted by dear DK at Culinary Bazaar.

Photobucket
Thai Yellow Curry

Photobucket Print This Recipe
Thai Yellow Curry Paste
Prep Time: 10 mins
Cooking Time: 2 mins for roasting the spices
Makes: 1 big Cup
Shelf Life: 1 month when refrigerated or 1 day if kept outside
Recipe Source: Real Vegetarian Thai by Nancie McDermott
Recipe Level: Easy
Spice Level: Medium

Ingredients:
1 medium Onion, peeled and quartered
8-10 finger length Dry Red Chillies, soaked in warm water for 20 mins
1½ inch Ginger or Galangal
1 cup Coriander Leaves, including its root and stems
4-6 Large Garlic Flakes
1 tbsp Lemongrass Paste or 3 stalks of Lemongrass, trimmed and cut into 1 inch pieces
½ tbsp Brown Sugar
1 tbsp Curry Powder (I used Kitchen King Powder)
1 tsp Turmeric Powder
2 tbsp Lime Juice
1 tsp Salt

Spices to Roast and Ground to Powder:
1½ tbsp Coriander Seeds
½ tbsp Cumin Seeds
10 Black or White Pepper Corns
Photobucket
Thai Yellow Curry Paste

Method:
Heat a pan and dry roast coriander seeds, cumin seeds and pepper on slow flame till they change colour and are aromatic, about 2 minutes. Transfer them to clean bowl and let them cool completely. With a help of coffee grinder or mortar and pestle grind them to fine powder.
Add this powder to all the ingredients listed above and grind them to smooth paste adding little water at time. Make sure that you add water only when it is required to get fairly thick and smooth paste.
You can store this paste in an air tight container and refrigerate for upto one month and use as and when needed.

Photobucket Print This Recipe
Veg Thai Yellow Curry
Prep Time: 10 mins
Cooking Time: 15 mins
Serves: 4-6
Recipe Source: Real Vegetarian Thai by Nancie McDermott
Recipe Level: Easy/Beginner to Intermediary
Spice Level: Medium
Serving Suggestion: With Jasmine Rice or Basmati Rice

Ingredients:
5-6 cups of Mixed Vegetables of your choice cut into bite size pieces (I have used half each of Red/Yellow/Orange Peppers, 1 medium Potato, 1 medium Carrot, 5 Baby Corns, Few French Beans, 5 Button Mushrooms, and Green Peas)
1 medium Onion or 4 Spring Onions, thinly sliced
1 can Coconut Milk or 2-3 cups of Coconut Milk
2-3 cups of Vegetable Stock or Water
2-3 tbsp Yellow Curry Paste
2 Kaffir Lime Leaves, thinly cut
1-2 tsp Brown Sugar
1 tbsp Soya Sauce
Coriander leaves of Spring Onion Greens for garnishing
Salt to taste
Photobucket
Thai Yellow Curry

Method:
Heat a heavy bottomed pan and empty 1/3rd of Coconut milk in a pan. Stir this coconut milk on medium heat till its sweet fragrance is released and starts to thicken, about 4-5 minutes, in a medium flame.
Now add 2-3 tbsp of Yellow Curry Paste and stir well. Keep stirring for 2-3 minutes till the curry paste blends well with the coconut milk and its raw smell disappears. Add the vegetables and spring onions to it and mix them well so that each piece is coated with coconut and curry paste mixture.
Mix in vegetable stock or water, remaining coconut milk, Soya sauce, kaffir lime leaves if using, brown sugar and salt to taste. Cover and cook for 5 minutes.
Open the lid and adjust the seasonings. Simmer the heat and let it cook uncovered for another 5 minutes till the vegetables are cooked to tender. Make sure that the vegetables are not overcooked and retain their crunch.
Garnish with finely chopped coriander leaves and greens of spring onion and serve with aromatic bowl of Jasmine Rice and enjoy.


Notes:
Other Thai recipes blogged so far,

09 January, 2009

Creamy Aloo-Capsicum Curry: A Delicious Beginning

Creamy Aloo-Capsicum Curry

Happy new year everybody! I know I am albeit late in wishing and replying to all those lovely wishes through emails and comments but I guess it’s better late than never. So how did you all celebrate your new year?

I am sure your New Year celebration must have been much better than ours. You see waiting to board flight in airport and sitting in those not-so-comfortable metal chairs is not exactly the best way to say good bye to 2008 and welcome 2009. But that is life… Once in a while it is fine to accept the fact that things may not go the way you want them to be!

Actually it was not that bad as much as I want to portray it. The last day of 2008 was spent doing the things I love the most, with my family eating Gol Gappas and delicious Chaats on the streets of Namma Bengaluru. Is there a better way to say good bye to 2008? Nah… And we welcomed 2009 in a lovely café cum restaurant in all new and spunky Bengaluru International Airport by enjoying delicious bowl of Plum Tomato Soup and Grilled Mediterranean Vegetable Sandwich.

Coming to cooking part, I have not been cooking lately as much as I would like to due to lack of interest in cooking. I am blaming my mom and mom-in-law for spoiling me with delicious food everyday of our most enjoyable holiday. I am feeling kind of lost in my own kitchen here after 35 days of pampering. And coming back from 30+ degrees of glorious sunshine to -8 degrees of cold waves is not exactly lifting my mood. I would have gone hibernating happily for few more days if not for some threatening mails and messages from some of you to spam my mailbox and comment section which are already suffocating with overdose of spam messages! Nada, no chance of spamming me anymore :P

Although my blog draft is overflowing with last year’s recipes, I decided against posting them. Common, it’s New Year and I didn’t want to serve leftovers for my readers. So I cooked this delicious, creamy Aloo and Capsicum Curry following my Amma’s recipe which she had cooked for us when we were in India. The ingredients are the common ones that is used in almost all the curry recipes but the cooking technique is little different. And taste-wise it is totally different from the usual curries that I make often. Crunchy, sweet peppers and all time favourite spuds cooked in creamy gravy is a delight in every way and was perfect balm with Cumin/Jeera Rice to sooth my homesickness.

Creamy Aloo-Capsicum Curry

Photobucket Print This Recipe
Creamy Aloo-Capsicum Curry (Delicious, creamy and colourful curry of Potatoes and coloured Peppers)
Prep Time: 10 mins
Cooking Time: 25-30 mins
Serves: 4-6
Recipe Source: Amma
Ingredients:
3 medium Potatoes, cooked, peeled and cut into 1 inch cubes
2-3 medium Peppers/Capsicums of any colour, cut into 1 inch squares
1 large/2 medium Onions, finely chopped
1 can chopped Tomatoes or 3 large and juicy Tomatoes, cubed
1 tsp Ginger-Garlic Paste
½ cup Coriander Leaves (including stems)
2 Green Chillies (Adjust acc to taste)
6-8 Cashew Nuts
1 tsp Garam Masala (Adjust acc to taste)
½ tsp Kitchen King Masala (Optional but recommended)
1 tsp Aamchur/Dry Mango Powder or 1 tbsp Lemon Juice (Adjust acc to taste)
1 tbsp Kasuri Methi/Dried Fenugreek Leaves (Optional but recommended)
1 tsp Sugar
1½ tsp Jeera/Cumin Seeds
1 tbsp Oil
Salt to taste
Creamy Aloo-Capsicum Curry

Method:
Heat oil in a pan and add cumin seeds to it. When it starts to sizzle and turn reddish brown, add finely chopped onions and sauté till it turns golden brown, about 3 minutes. Switch off the flame and let it cool slightly.
Grind half of sautéed onions, cubed tomatoes, coriander leaves, green chillies and cashew nuts to a smooth paste without adding any water.
Switch on the gas and add ginger garlic paste and kasuri methi to half of sautéed onions. Cook it for another 1-2 minutes till raw smell of the paste disappears.
Now add ground paste and cook on medium heat till oil separates from the paste and it becomes little dry, about 5-6 mins. Add garam masala, kitchen king masala, sugar and salt to taste and mix well.
Mix in 1½ cups of water along with chopped peppers and boiled and cubed potatoes. Reduce the heat and cover and cook for 5 minutes. Remove the lid and adjust the seasonings and add little more water if needed.
Add finely chopped coriander leaves and cook for another 2-3 minutes till all the flavours blend well. Remember not to over cook the peppers and it tastes best when it just half cooked and retains its crunch.
Serve it hot with any flavoured rice or Indian flat breads and enjoy this creamy delight.